Measure the Adequacy of Android Unit Tests with Mutation Testing
Unit tests are an essential tool in a trustworthy test suite for an Android application or any other software system for that matter. But unit tests themselves doesn’t guarantee that the right features or requirements are tested, even if you did a thorough effort to cover as much code as possible in your entire code base with them. It only proves that the system is actually tested, but says nothing about the quality of the tests. Mutation tests can help with this issue, by measuring the quality of your unit tests by manipulating your code under test. Mutation tests can be seen as the tests of your unit tests.
So, what Exactly is Mutation Testing?
In a nutshell mutation testing is a mechanism to inject different kinds of errors (mutants) into your code base while running your tests. A mutant could be changing a simple conditional in your Java code from == to !=. Generally, mutants try to simulate common programming errors like accidentally inverting an if statement, returning null instead of a real object, etc.
If your test covering the piece of code where this mutant was injected still passes, then the mutant survived. If on the other hand the test fails, then the mutant was killed. As you might already have guessed, the terminology in mutation testing is somehow opposite of normal test results, as killed mutants is a good thing, while surviving mutants is a bad thing, since they indicate, that we didn’t write our test well enough.
Mutation tests are significantly slower to run than the unit test suite they are covering, since all tests are executed for each mutant. Therefore, a strategy for setting up mutation testing for a large code base with many unit tests, could be to divide the tests in chunks or setting the mutation tests up only to cover modified code.
PIT is a free mutation testing system for Java, capable of measuring the quality of unit tests by injecting a number of different errors into the code base under test. PIT produces a report displaying how much of the code that was covered by the tests, combined with information about surviving and killed mutants.
With a little setup, PIT can be used to do mutation testing on an Android project.
A Simple Example
Let’s say we have a really simple Java class representing a geometric angle expressed with degrees as an integer. The only thing Angle objects can do is checking whether their degrees are greater than another Angle object’s degrees through an isGreaterThan() method.
public final class Angle {

    private final int degrees;

    public Angle(int degrees) {
        this.degrees = degrees;
    }

    public boolean isGreaterThan(Angle otherAngle) {
        return this.degrees > otherAngle.degrees;
    }
}
For now we don’t mind, that the Angle class probably is too simple for any practical usage. Instead we take a look at the unit tests covering the isGreaterThan() method.
public class AngleTest {

    @Test
    public void returnsTrueWhenComparedToASmallerAngle() throws Exception {
        assertThat(
            new Angle(2).isGreaterThan(new Angle(1)),
            is(true)
        );
    }

    @Test
    public void returnsFalseWhenComparedToAGreaterAngle() throws Exception {
        assertThat(
            new Angle(1).isGreaterThan(new Angle(2)),
            is(false)
        );
    }
}
At first sight the two test methods seems to cover the most important outcome of the isGreaterThan() method, and all lines in the Angle class are covered by the tests. First we test that we get a positive (true) result, if we provide an Angle object to the isGreaterThan() method that is definitely not greater. In the next test method we do the exact opposite.
If we run the tests they’ll obviously pass. But running a PIT test against our test class gives a more detailed view, if we take a look at the generated report.
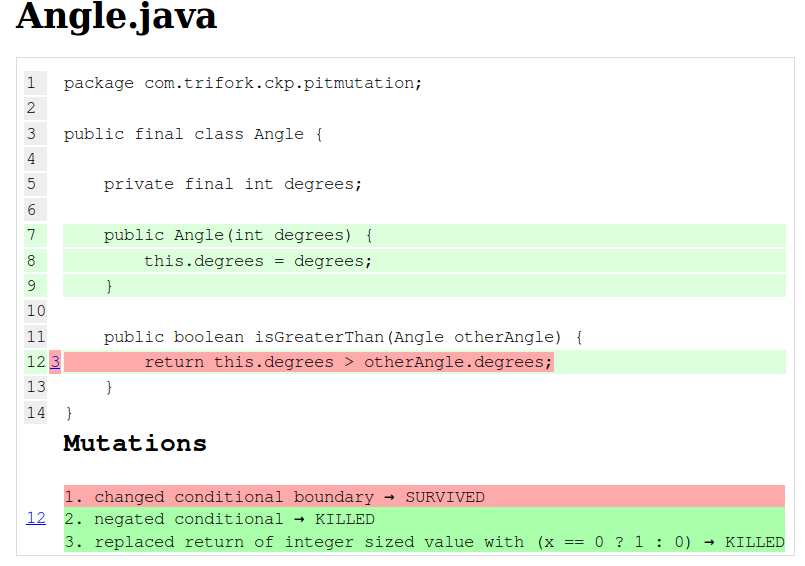
PIT tells us that it has injected a number of mutations into our isGreaterThan() method, but one of them wasn’t caught by our tests. Taking a deeper look we see that if the > conditional on line 12 is replaced with >=, all our tests will still pass. Clearly we forgot to test for this case. The solution almost suggests itself – we simply need to add a new test case comparing two Angle objects holding the same degrees.
@Test
public void returnsFalseWhenComparedToAngleWithSameDegrees() throws Exception {
    assertThat(
        new Angle(2).isGreaterThan(new Angle(2)),
        is(false)
    );
}
If we run PIT again, the previous mutant will be killed. In this case PIT showcased a lack in our test case, that we might not have noticed ourselves, if someday our production code would change. Simply because our tests didn’t cover every possible path through the code, even though we had a 100% code coverage.
Apply PIT Tests for an Android Project
When taking a look at the Getting Started section on the PIT website one notices that a third-party Gradle plug-in for PIT is available. Unfortunately, the plug-in is not (yet) compatible with Android projects, as the Android plug-in is conflicting with Java. At the time of writing, the Gradle plug-in has been forked in a new experimental third-party Gradle plug-in for PIT developed for Android use available on GitHub. The plug-in is still under development, but integrates well with PIT. After installing the plug-in in a Gradle based Android project, PIT reports in HTML or XML can be generated from the command line by typing:
$ ./gradlew pitest
Alternatively, PIT test can also be run from the command line, even though it is not recommended. It requires that the class path for the Android project in question is set up correctly. If you try to do that, be aware, that the reference to Android SDK jar file on the class path should be placed after the reference to the JUnit dependency. Otherwise the PIT test run will fail.
Testing Android Code
As PIT is running on the JVM it can easily apply mutation tests for POJO (Plain old Java object) classes like the Angle class mentioned above, that has no references to the Android SDK. If we want to do mutation testing for Android specific classes like Activities and Fragments that holds some of the essential logic for our Android applications we can take advantage of the Robolectric test framework, which runs Android unit tests inside the JVM without the need for emulators or physical devices.
On GitHub you can check out an experimental Android project using the Angle class from before and set up with Robolectric unit tests and the experimental PIT Gradle plug-in.
The Android project contains a really simple user interface with two progress bars each representing an Angle object. Below the two progress bars a text label is indicating which one of the two Angles are currently the greatest.
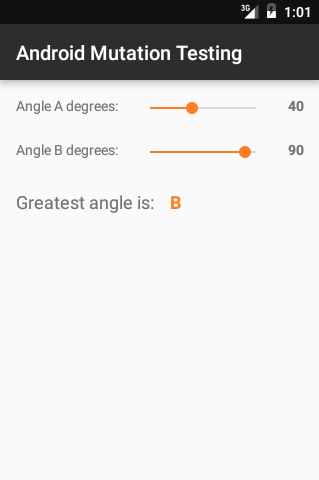
The logic updating the user interface is found in the MainActivity class, and a MainActivityTest class has been set up to test it using Robolectric.
@RunWith(RobolectricGradleTestRunner.class)
@Config(constants = BuildConfig.class)
public class MainActivityTest {

    private SeekBar seekBarAngleA, seekBarAngleB;
    private TextView valueAngleA, valueAngleB, result;

    @Before
    public void setUp() throws Exception {
        MainActivity activity = Robolectric.setupActivity(MainActivity.class);
        this.seekBarAngleA = (SeekBar) activity.findViewById(R.id.seekbar_angle_a);
        this.seekBarAngleB = (SeekBar) activity.findViewById(R.id.seekbar_angle_b);
        this.valueAngleA = (TextView) activity.findViewById(R.id.value_angle_a);
        this.valueAngleB = (TextView) activity.findViewById(R.id.value_angle_b);
        this.result = (TextView) activity.findViewById(R.id.result);
    }

    @Test
    public void testGreatestAngleIsA() throws Exception {
        seekBarAngleA.setProgress(90);
        seekBarAngleB.setProgress(10);

        assertThat(valueAngleA.getText().toString(), is("90"));
        assertThat(valueAngleB.getText().toString(), is("10"));
        assertThat(result.getText().toString(), is("A"));
    }

    // [...]
}
Just like before we’re testing the possible outcomes of comparing two angles – but this time from a user interface perspective. That means we have access to the various views the user interacts with, so that we can manipulate the view programmatically or react to Android lifecycle events. Likewise, PIT will inject mutants into the Activity code, and the quality of the unit tests found in MainActivityTest can be judged by the number of killed mutants.
Fortunately, the Gradle plug-in for PIT supports Robolectric tests quite well, but since Robolectric tests are quite slower than traditional unit tests, PIT might run into timeout issues with some of the tests. For now, this can be fixed by increasing the timeout setting sent to PIT in the app’s build.gradle file.
Conclusion
Mutation tests can make an existing test suite stronger, if the complete setup has been well designed and thought through. They act as tests of unit tests and therefore provide more confidence in the test suite. This post has briefly touched the overall concept of mutation testing based on a simple practical example as well as describing how mutation testing can be incorporated in the test work-flow for an Android project. Other essential test techniques and practices like TDD, following a test-first approach, doing automatic UI testing, mocking, stubbing and faking dependencies are all worth considering, and mutation testing can be the icing on the cake in such a setup.
Setting up mutation tests for Android projects can be a little tricky, as there are a few caveats to take into account. Personally, I think that mutation tests will serve an Android project best, if the mutation test routine is applied early in the process as part of a test-first approach. Just like it’s hard to apply tests to already existing non-tested code, it is equally hard to apply mutation tests to an existing unit test suite.