From the trenches: Rendering Twitter Bootstrap form inputs for Spring-MVC with FreeMarker macros
This is the first entry in a new series of what we hope will become a regular appearance on our Trifork blog: “from the trenches”, with blogs that explain in a no-nonsense just-the-tech fashion how we applied certain tools, technologies, libraries and frameworks in our own projects to solve real-world challenges that we faced while building solutions for our clients. We hope that by sharing the solutions we came up with, we can provide you with some examples and ideas that you can apply to your own projects — with the confidence of knowing that these techniques have proven themselves in real production systems.
We are also open to your suggestions on what technologies you might want us to cover. So don’t be shy and just drop us a note if you have any ideas.
In this first blog I’d like to cover how we used FreeMarker to build a small library of macros that make it very easy and effort-free to work with Twitter Bootstrap-based forms in a Spring-MVC application.
TL;DR: we’ve built a set of FreeMarker form macros for Spring-MVC apps with a Twitter Bootstrap-based frontend that allow one-liners in your form templates to render full Bootstrap-based HTML structures for various input types that include internationalized labels and rendering of binding and validation errors while allowing passing in custom attributes and nested contents. It’s awesome.
Twitter Bootstrap form input overview
Even if you haven’t heard of Twitter Bootstrap yet, you’re bound to have seen several sites that have been built with it. Bootstrap is a very popular CSS framework that originated at Twitter which makes it easy to build good-looking web sites and applications by offering, amongst other things, a multi-column grid framework, standard components like tables and form inputs and support for responsive UIs that adapt themselves to the device that you’re using.
Having standard CSS classes for common layouts and components and good documentation with lots of examples makes it easy enough for backend-minded people like myself to work on the frontend on their own once a solid design has been put in place, which in my case is really saying a lot about the power and quality of the framework 😉
Recently we’ve built a Spring-MVC application that has a Bootstrap-powered front end. This particular application is very data-entry centric, so it contains a lot of HTML forms. We chose to use Bootstrap’s horizontal form layout for most of our forms, which means that the input labels are placed to the left of the inputs rather than on top of them. In Bootstrap, that requires creating a set of nested DIVs for each input that looks something like this:
<div class="control-group">
  <label class="control-label" for="certificate">
    Certificate number
  </label>
  <div class="controls">
    <input type="text" id="certificate" name="certificate"
           value="12345678" required class='span4'>
  </div>
</div>
As you can see, the whole thing is wrapped in a .control-group div which has the label and a .controls div containing the actual input. The input has a pre-bound value, as it is rendering existing data, and has two custom (i.e. not applicable to all inputs) attributes “required” and “class=’span4’”. The former is the HTML 5 way of specifying a required field, the latter a Bootstrap directive that indicates that the input should span four of the twelve columns that Bootstraps divides the screen in.
It’s obvious that a lot of this layout is just boilerplate for all text inputs, but some of it will be specific per input. Also, to show an existing value in a Spring-MVC app and to bind the input value on form submit, we’ll need some way to bind a property of a Java form-backing object to this input.
In addition to this, we really want the label’s text to come from a resource bundle for internationalization purposes and we also want to show any errors resulting from binding or validation errors next to the input field. For other input types similar requirements exist.
To do all of that in your view template (JSP, Velocity, FreeMarker file or something similar) for each input would result in a lot of repetitive code, which would be hard to maintain and bloat the views.
Therefore, we decided to develop a more DRY approach to render these inputs.
FreeMarker macros to the rescue
FreeMarker is a Java-based templating library that can be used for many different purposes, one of the most popular ones being rendering HTML as an alternative to JSPs.
FreeMarker supports writing macros that can be used to render dynamic content. Macros take arguments, which can be passed in as a sequence of values (like calling a Java method) or by passing in a list of key-value pairs to only specify certain arguments by name and skip others. Arguments can have default values, which can even be based on other arguments. All in all, this provides an easy yet very powerful mechanism for extracting commonly used functionality in a single place, which I personally find even easier to use than custom JSP tags (which don’t require writing Java code anymore for quite some time now).
Spring ships with FreeMarker support out-of-the-box in the form of a number of form macros. These macros take care of rendering HTML form inputs with two-way binding to form-backing object’s properties and of rendering binding and validation errors.
Using these built-in macros, the above example might be rendered by a template that looks something like this:
<div class="control-group">
  <label class="control-label" for="certificate">
    <@spring.message 'asbestosSource.certificate'/>
  </label>
  <div class="controls">
    <@spring.formInput "asbestosSource.certificate"
                       "required class='span4'"/>
    <span class="help-inline">
      <@spring.showErrors ", "/>
    </span>
  </div>
</div>
The ‘asbestosSource’ variable here refers to the form-backing object (this particular application operates in the domain of asbestos inventories), ‘certificate’ is a property of that object. The formInput macro is called with two arguments, the first one being the path of the property to bind and the second providing custom attributes for the generated input tag. The next line is showing how to render binding and validation errors using Bootstrap’s .help-inline CSS class.
However, in Bootstrap you should add an “error” class to the outer div if you want it to render an erroneous value. This will cause the whole thing to be rendered in red and clearly stand out. The Spring macro to render errors won’t help us in this case as we need to know if there’s an error before actually rendering the error itself.
This means we’ll need to go a level lower and work with Spring’s ‘bind’ macro directly so that we can detect errors ahead of rendering them.
Our own form macro library
This is where we need to dive into the working of Spring-MVC in a bit more detail. When a form has been submitted, Spring usually tries to bind the various request parameters to a single object that’s passed as a parameter to a controller method. That binding can fail. In addition to binding, you can ask Spring to perform validation of those objects as well, which can result in additional errors. Those errors are made available to your views, so that you can re-render the form with the values the user entered and the corresponding error messages.
With Spring’s FreeMarker support, there’s a macro provided that triggers the binding result to become available through some variables. We can use this to handle the rendering of errors ourselves in our own macro.
Apart from that requirement to add an .error class when there are errors, what should we pass to our macro to have it take care of everything we need? So far, we’ve identified the following:
- we need the path to the property to bind to;
- we need to know the key to use to look up the label’s text in our resource bundle;
- we need to be able to pass in custom attributes.
While developing our application, we discovered two more requirements:
- in some situations we’d like to be able to pass in extra contents to be rendered after the input inside the .controls div, e.g. a popup with an explanation about the type of input required;
- we want to be able to specify the input type, so that instead of ‘text’ we can use ‘password’ or one of the new HTML 5 types like ‘number’ or ‘email’ that provide client-side validation.
For looking up the label text, it makes sense to use the specified path as the message key in many cases. However, this is not always applicable: different paths might require the same label to be used, especially for nested paths.
This resulted in the following FreeMarker macro definition (we added some documentation to all our macros as well):
<#--
* textInput
*
* @param path the name of the field to bind to
* @param attributes any additional attributes for the input element (such as class or CSS styles or size)
* @param messageKey key to lookup in resource bundle, defaults to path
* @param type input type: defaults to "text"
-->
<#macro textInput path attributes="" messageKey=path type="text">
  <@spring.bind path/>
  <#assign error>
    <#if spring.status.errorMessages?has_content>error</#if>
  </#assign>
  <div class="control-group ${error}">
    <#assign id="${spring.status.expression?replace('[','')?replace(']','')}">
    <label class="control-label" for="${id}">
      <@spring.message messageKey/>
    </label>
    <div class="controls">
      <input type="${type}" id="${id}"
             name="${spring.status.expression}"
             value="${spring.stringStatusValue}" ${attributes}>
      <#if error?has_content>
        <span class="help-inline">
          ${spring.status.errorMessages?first}
        </span>
      </#if>
      <#nested>
    </div>
  </div>
</#macro>
What this shows is that after invoking the spring.bind macro, we can access the ‘status’ variable that’s available in the ‘spring’ scope. This status provides us with info about any errors for the current input that might exist. Note that we’re only rendering the first error message, even if more than one exists. We haven’t really found a need to show multiple errors for a single field, but it would be easy enough to iterate over all the errors if you’d like to change that.
A typical invocation of this macro from within a template would look something like this:
<@form.textInput "asbestosSource.certificate" "required class='span4'"/>
Here we’re relying on the order of the macro’s attributes, only specifying the first two.
In other cases you might need to specify the attribute names since you’re skipping some:
<@form.textInput path="organization.invoiceEmail" type="email"/>
Other input types
For form fields other than text inputs, like radio buttons, select dropdowns, etc. we’ve developed macros as well. Most of these are pretty generic and are similar to the macro you just saw, some are very application-specific and perform custom tasks that involve e.g. custom JQuery scripts to add behavior to the relevant inputs.
I’ve made the ones that I thought were general-purpose enough to be useful for other apps publicly available in this Gist: I won’t cover the whole thing in this blog, but I’d like to describe one more macro as it requires some custom FreeMarker configuration to work.
Another common requirement that we had was to show a list of checkboxes based on a Java enum, for example to allow choosing a set of roles while performing maintenance of users where the application defines a “Role” enum. In order to work with Enum values from within FreeMarker, you have to perform some additional setup which Spring makes quite easy.
When using FreeMarker in a Spring-MVC app, you configure a FreeMarkerViewResolver bean. You can specify attributes that should be made available to all templates there. In order expose a new attribute called ‘enums’ that allows you to work with enums in your templates, this is what you can do:
<bean
 class="org.springframework.web.servlet.view.freemarker.FreeMarkerViewResolver">
 <property name="suffix" value=".ftl"/>
 <property name="requestContextAttribute" value="rc"/>
 <property name="contentType" value="text/html; charset=utf-8"/>
 <property name="attributesMap">
  <map>
   <entry key="enums" value=
    "#{T(freemarker.ext.beans.BeansWrapper).defaultInstance.enumModels}"/>
  </map>
 </property>
</bean>
The requestContextAttribute makes a standard Spring object of type RequestContext available under the name ‘rc’ to all your templates; some of our macros rely on that. The attributesMap configuration provides an additional ‘enums’ attribute to your templates. That object is used in a macro we wrote that renders checkboxes based on an enum’s values:
<#--
* enumcheckboxes
*
* Show checkboxes based on enum values.
* Labels are resource bundle lookups by
* "[enumType.class.simpleName].[name]",
* falling back to enum's toString().
*
* @param path the name of the field to bind to
* @param enum fully qualified type name of the enum
* @param attributes any additional attributes for the element (such as class or CSS styles or size)
-->
<#macro enumcheckboxes path enum attributes="">
  <@spring.bind path/>
  <#list enums[enum]?values as value>
  <#assign id="${spring.status.expression?replace('[','')?replace(']','')}${value_index}">
  <#assign isSelected = spring.contains(spring.status.actualValue?default([""]), value)>
  <div class="control-group">
    <label class="control-label" for="${id}">
      <@spring.messageText (value.class.simpleName + '.' + value.name())
                           value.toString()/>
    </label>
    <div class="controls">
      <input type="checkbox" id="${id}"
             name="${spring.status.expression}"
             value="${value.name()?html}"
             <#if isSelected> checked="checked"</#if>
             ${attributes}>
    </div>
  </div>
  </#list>
  <input type="hidden" name="_${spring.status.expression}" value="on"/>
</#macro>
We invoke this as follows:
<@form.enumcheckboxes "user.roles" "nl.trifork.ascert.domain.Role"/>
It doesn’t really get much easier than this:
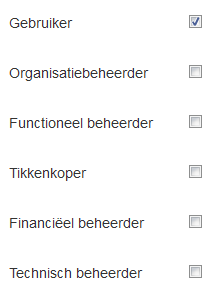
The result of all of this work is that most of our form templates only have a single line per input: just the macro invocation. It makes for really compact and maintainable code. There is a small number of cases where the required output is just too custom: in those cases, we simply render the required markup directly from the template, using the Spring macros that you’ve seen in this posting. Examples of this are e.g. combined inputs where we first show a numerical input and then a dropdown specifying the unit of that number, where a validation error of the number should be shown after the dropdown. It doesn’t make sense to try to come up with a generic solution for such specific cases: after all, you’re building an application, not a framework.
Conclusion
We’ve found that FreeMarker macros provided an excellent way to consolidate the work needed to render the most commonly used form inputs in our Twitter Bootstrap-based web frontend. You should not be afraid to go beyond the support that’s offered by Spring out of the box in terms of form macros if they don’t cater to your needs; by inspecting those macros and understanding your own requirements it becomes clear what you need to provide yourself to optimally support your common use cases. Investing a little bit of time in developing a set of macros for this easily pays back for itself by providing you with short development times for forms that are easy to maintain and provide a high degree of consistency throughout your app.
For other templating solutions like JSP or Thymeleaf you can easily adapt this principle to custom tags, functions or whatever your solution of choice happens to offer.
We hope you had an enjoyable read; if you have any HTML templating experiences of your own you want to share we’re always happy to hear about them!