Elasticsearch & Spring MVC & Sencha Touch 2 in the Cloud – Part 1
Introduction
Welcome to my third blog entry. In this one, I want to show how to connect three different technologies (database, REST service, and a mobile framework) and deploy them into the cloud. Those three technologies are:
- Elasticsearch (Database)
- Spring MVC (REST service)
- Sencha Touch 2 (Client side framework)
First, I want to give a short introduction of the three technologies. I am going to start with Elasticsearch, followed by Spring MVC and in the end Sencha Touch 2. In the second part, I will explain the services that I used. The first service is called searchly and is a database service. The second service is cloudbees and is used as cloud host. In the end a conclusion is given. Part 2 of this blog will cover a demo with the steps to connect everything with each other. I wish you fun reading this entry and if there are any questions don’t hesitate to drop a comment (Of course you can drop also a comment if you just like it).
Technologies
Elasticsearch
Elasticsearch was used as database. It is using a NoSQL approach and it is one of the fastest database at the moment. The data gets stored in a so called document. This document contains key-value pairs and if you are familiar with JSON you should be able to understand and to read it. For more information about Elasticsearch go to their website.
Spring MVC
Spring MVC was used to establish the connection between the database and the client side framework. Spring MVC uses a RESTful web service to receive calls of a client. To connect my Spring MVC application with the database service, I had to include an Elasticsearch java client with the name “JEST”. JEST is a Java HTTP Rest client for elasticsearch and is open source. The source code of the client is in github available. Additionally I had to modify the Spring MVC application to work with JSONP. The modification was not difficult because I found a github project which had the needed implementation to support JSONP.
Sencha Touch 2
On the client side, I used Sencha Touch 2. Sencha Touch 2 is a framework to create mobile web-based applications. It is open source and provides a lot of features such as native packaging, etc. As default data transfer type Sencha Touch 2 uses JSONP. It is possible to use normal JSON or XML as well. JSONP is such as JSON just with the addition to provide a callback function.
Services
Searchly
Searchly is service to create Elasticsearch instances in the cloud. The service has the option to create a free account which includes the creation of two Elasticsearch indexes and a total storage of 5 mb (that is handy). That should be also enough for just developing and playing around 😉
Cloudbees
Cloudbees is a service that offers you to deploy your application in the cloud. There are several other service out such as Heroku etc. I choose for Cloudbees because you can create a free account. Cloudbees also has the option to choose a region (US or EU) where the application should be deployed.
Conclusion
An Elasticsearch instance is created which is in a cloud environment. Our Spring MVC project is deployed on a cloud platform and is connected with the database and the mobile framework. We can conclude that all three technologies can work together and it is possible to deploy them into the cloud. Part 2 of this blog will show you guys how to do it.
Demo Part 1
Step 1: Create Searchly Account

To create a Searchly account go to Searchly. Fill in there your organization (optional), email (mandatory), password (mandatory), and a password confirmation. You should get an email to confirm your account. After the confirmation you get redirect to create your new app space.

We need to give a name to the app space and we need to specify the cloud region. In this demo I choose the app space name “Elastic-Search-Sencha-Touch-Demo” and as region I took Europe. Click on create and your Elasticsearch instance will be created and you get forwarded to your personal dashboard.
Step 2: Create Spring MVC Project
I created the Spring MVC application in Intellij as IDE. However, the creation the application should be similar in Eclipse or Netbeans. Click to create a new project and select Spring MVC. Give your project a name and that was it.

The next is step is to create a user model (yes the demo was about how to register a user ;)) .Let us create a new package in the java source folder with the name model. In this package we create a new class named User. To keep it simple the user has just three properties an id, an email, and a password.
Okay, we have our user model. Next step is to add the support of JSONP on the server side. There is a github project (https://github.com/bhagyas/spring-jsonp-support) which provides the needed classes to work with JSONP in Spring. You can include the project to your project or just copy the three classes of the github project and create a new package for example JSONP and paste the three classes in it that is how I did it.
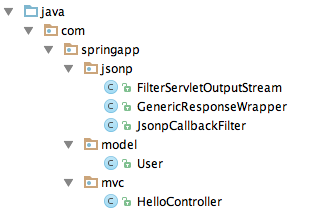
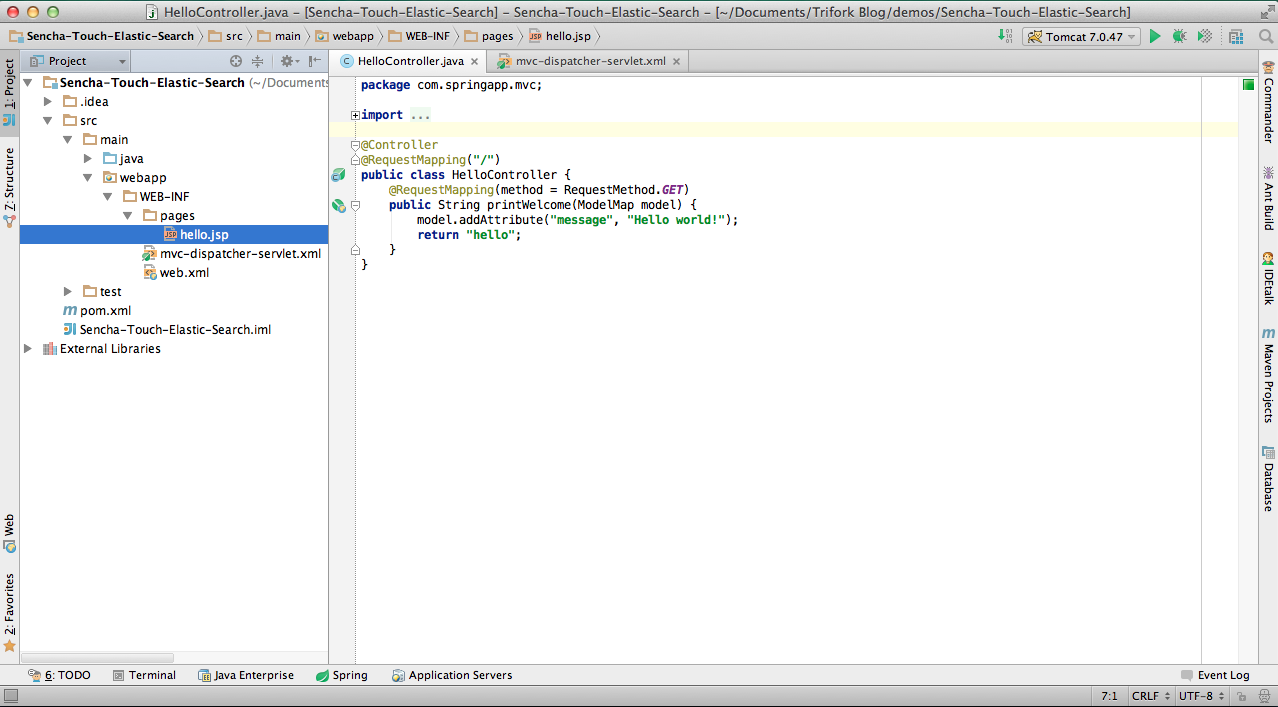
We could use the HelloController for receiving a request of a client but let us create an own controller. Create a new class in the mvc package and name it “RegistrationController”. Add the controller annotation and a request mapping annotation to it. Also we need a method to register a user which should be a return a String.
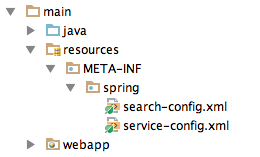
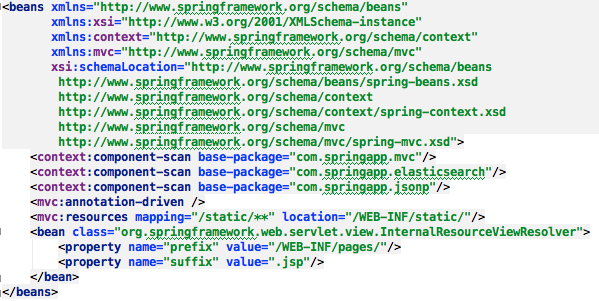
In addition we need to modify our web.xml and mvc-dispatcher-servlet.xml files. Those files are to find in the webapp folder. I am used to create an extra resources package and to include their xml files. That can comes handy if the project is growing. So let us create a resources folder next to our java and webapp folder. In this demo I use the structure resources/META-INF/spring and created two xml files. One with the name search-config the other service-config.

Both xml files are similar they are just differentiate in one line. On the left side is the search-config.xml file. For the service-config.xml file, we replace the second last line with “context:component-scan base-package=”com.springapp.jsonp””.
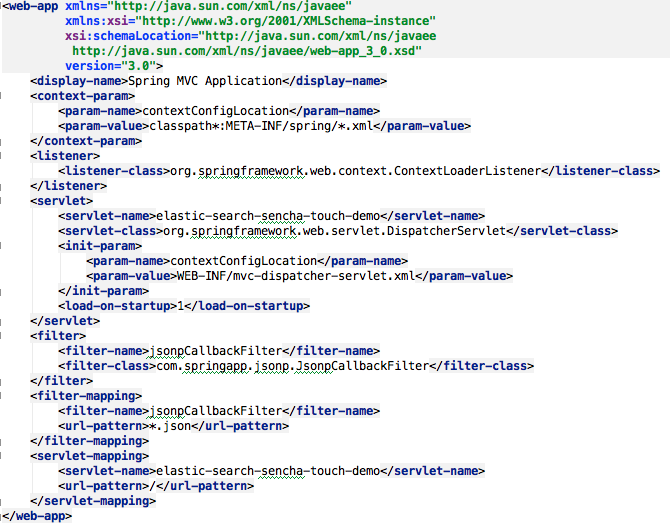
Alright done 🙂 we can modify the web.xml and mvc-dispatcher-servlet.xml file. On the right side is the implementation of the web.xml, below is mvc-dispatcher-servlet.xml.
The next step is to add a new folder in the webapp/WEB-INF directory with the name static and last but not least we need to add dependencies to the pom.xml.
- jackson-core
- jackson-databind
- jest
Step 3: Connect Spring MVC with ElasticSearch
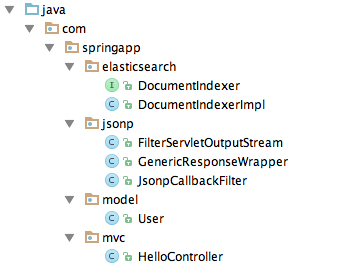
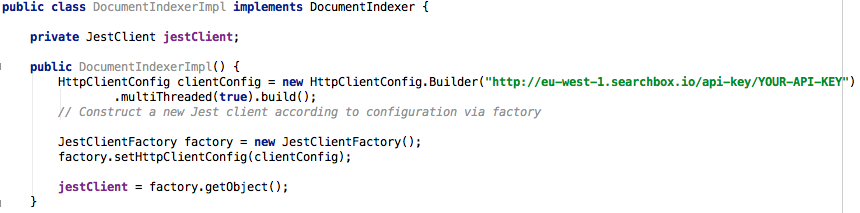
To connect our fresh created Spring MVC project with the database we need to use the JEST client. The JEST client was added as an dependency in the previous step. Let us create a new package with the name elasticsearch and create an interface with the name “DocumentIndexer” and a java class “DocumentIndexerImpl” which implements the interface.
The interface contains one method which is responsible for the creation of the user index and to insert a user in the index. The DocumentIndexerImpl contains the logic to create the index and to add the user in the index with the help of the JEST client.
The only interesting part is the creation of the client configuration in the first line of the constructor. In the place where stands “YOUR-API-KEY” you need to paste your Searchly API key (you can find the key on your Searchly dashboard).
The createAndAddUserIndex method is defined as
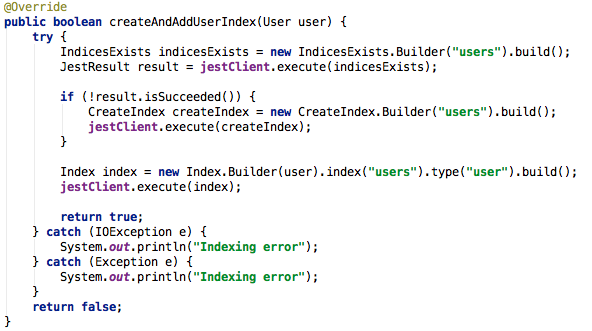
The Spring MVC project is now connected with the elasticsearch instance and is able to create an index and to insert a new user. Even better the index will just be created if the index is not there.
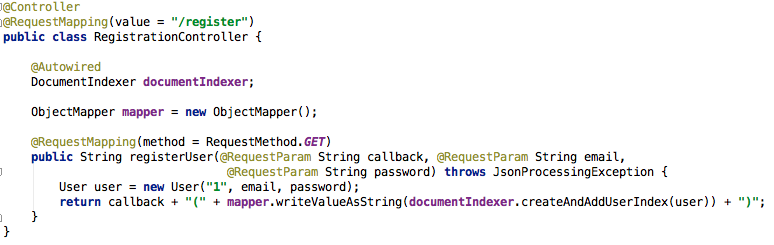
So far so good, our RegistrationController can register a user when we include the DocumentIndexer to it.