Introducing a Query tool as an Elasticsearch plugin (part 1)

In the past few weeks I have been working with Elasticsearch. I was missing a plugin to look at the data, create queries and evaluate different facets. That was when I decided to start working on a plugin that enables you to do just this.
I have been working on AngularJS together with Twitter Bootstrap, therefore the choice as to which technology to use was not a difficult one. I also used some additional libraries, but I’ll tell you more on this later on.
Why did I put the part 1 in the title? I am going to split this information into two parts. This part deals with the setup of the plugin, the libraries I used and the functionality I implemented. Then the next part deals with providing more details about interacting with Elasticsearch; how I use the facets, create the queries, etc. I will also write down some lessons learned with respect to AngularJS in a later blog post.
Now let’s move on and have a look at the features:
Description of the plugin
Screens with functionality
The best way to describe the functionality of the plugin is to have a look at the most important screen for the current functionality. After the image I’ll explain the different numbers.
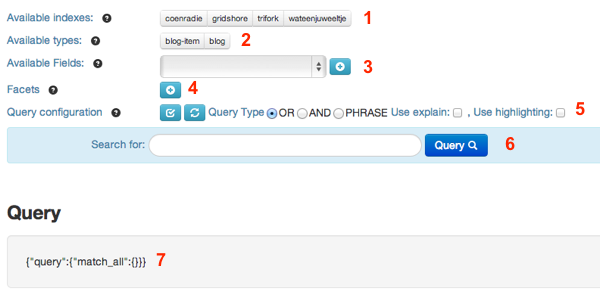
- By clicking the buttons you can select the indexes to query. Selecting nothing means selecting everything.
- By clicking the buttons you can select the content types. For testing purposes I used a different type for some of the blogs. Again clicking none of the buttons means selecting all content types.
- Here you can select the fields to show in the results.
- Here you can select a few different type of facets. At the moment I have: Term, Range and DateHistogram facets.
- The first button re-evaluates the query, it does not execute it, only shows it. The refresh button refreshes the form (beware it does not work properly yet). You can make the query an OR, AND or Phrase query. We use Match queries for all types and always query for all the fields. Finally you can use explain and highlighting. If you switch on highlighting you have to select a number of fields that can contain the highlights.
- Here you can enter the terms to look for.
- Shows the query that will be executed with the current state of the form.
Results of a query
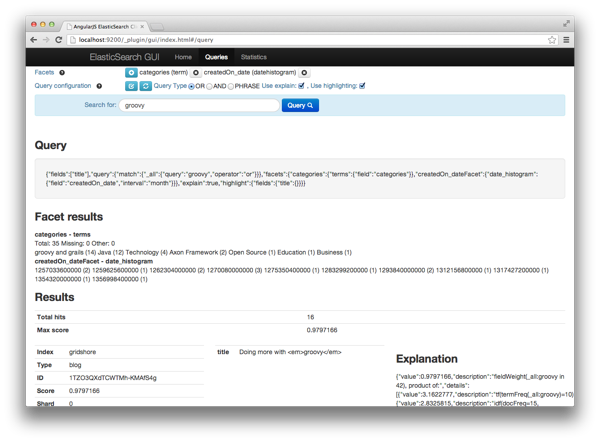
The following screen shows the result of a query with two facets, one field and highlighting switched on. Check the query is executed. The Facet results shows the amount of items per month containing the term groovy. You can also see a part of the explanation.
The content
The content for the demo is coming from a number of wordpress blogs that I maintain or write for. On my personal blog I wrote down how I used groovy to extract information from the blogs and add the content to Elasticsearch. Links are provided below if you are interested.
Doing more Elasticsearch with groovy
You should now have a fair understanding of what the plugin does. The next step is know how to install it and understand the structure of the sources.
Explaining the plugin
If you want to learn more about what you can do with an Elasticsearch plugin, I urge you to have a look at the documentation. I have not added my plugin to a repository. You can find the sources on github. During development of the plugin I create a symbolic link from the _plugins/gui/_site to my checked out github project. (see sources). Elasticsearch will provide all content under _site in a plugin as static html resources. Which is perfect for AngularJS.
Sources
https://github.com/jettro/elasticsearch-gui
Structure
As you might expect, it all starts with the index.html in the root of the project. This file initializes AngularJS, loads all the required libraries and stylesheets. The other resources are decided into the following folders.
| css | Contains the stylsheets for the app and from bootstrap |
|---|---|
| img | Contains the bootstrap glyphicons |
| js | Contains the javascript files for the project |
| lib | Contains the javascript libraries for angular, bootstrap, Elasticsearch and query |
| partials | Contains the html partials that enables us to create multiple pages with partial content |
| template | Contains the html as required by AngularJS plugins like navigation, popovers and modals. |
Libraries
To make the plugin work without to much code, we use a few JavaScript libraries besides the big ones. We use the excellent javascript client for Elasticsearch. The documentation for this project is excellent. In addition to the client we also have some help integrating this client with AngularJS. Using this library Elasticsearch is injected as a service into your components.
The other interesting library that we use is helping us to integrate bootstrap with AngularJS. This plugin can be found on the angularJS distribution.
Keep up to date with this blog site if you are interested in angularjs, I’ll write down some lessons learned in one of my next blog posts.
Conclusion
I hope this blog post has given enough information to make you understand the plugin. Have a look at the source code and try it out on your own Elasticsearch instance. In my next blog post I’ll dive deeper into the code that interacts with Elasticsearch. Keep you posted.
Check out the second part of this series of blog posts