iOS Development Tips & Tricks – Part I
As you might know, I am very fond of developing apps for the iOS platform. I started back in mid-2009 by trying to create an app for the Dutch Lowlands festival but I unfortunately failed to make the app a reality. I didn’t care because now I learned how to write iPhone apps!

After that I never stopped trying out new app ideas in my spare time and occasionally blogging about it. In 2010, I created an app to use to communicate with friends using our custom forum-like website which was called ‘Yert’.
 And later, March 2011, I created an app in my spare time together with my uncle (Jos Jong) and brother (Jim van Zummeren) which turned out to be quite profitable: Easy Calendar. I learned the most creating this app. I also developed some iOS apps for clients of Trifork, for example I made the love to load app for The New Motion and an app that allows doctors to log their hours for GeriMedica: Ysis Mobiel.
Oh, and I almost forgot: Learn to write with Tracy! An iPad app that makes learning how to write for children more fun and thus effective.
Next to the apps that made it into the App Store, I worked on a bunch of other ideas in my spare time that unfortunately never saw the light of day. But I learned from them every time. I want to share some tips & tricks with you all, which I learned over time. I want to talk about what tools I use nowadays, what frameworks I recommend and the different ways of distributing an app.
IDE: AppCode
 First off, I want to talk about AppCode, which I think is the best IDE for the job. I talked about it in great detail in a blog I wrote earlier: AppCode: IntelliJ for Objective C!. After using it for over two years I still think it is the best IDE for creating iOS apps. Xcode (the IDE that comes bundled with the iOS SDK) has become better and better since I wrote that blog, but still AppCode triumphs. It is hard to say why it is better in one sentence, so I recommend reading the AppCode blog I wrote. But if you know IntelliJ you know what I am talking about. The way IntelliJ is better than Eclipse, the same way AppCode is better than Xcode.

AppCode is not a full replacement of Xcode, which actually is an advantage! It opens Xcode project files and saves them back as Xcode project files. This makes it possible to still switch back to Xcode at any time. So there is no risk involved trying to use AppCode. For example AppCode doesn’t have the Storyboard interface designer. You can simply switch back any time you need to create a storyboard, and continue writing code using AppCode. Also, whenever there is a big change in Xcode, for example new language features, it generally only takes AppCode a couple of weeks to catch up in the form of an update.
Dependency management: CocoaPods
Next up is dependency management. Admittedly, with iOS you don’t need as much dependencies as you do when developing Java applications. Most of the stuff you’re going to need is already included in the iOS SDK. But for the dependencies you DO need, CocoaPods is your friend! It’s a popular dependency management tool for iOS (and Mac).
The way it works is really easy. Simply install it on your Mac with the following Terminal command:
sudo gem install cocoapods
After it’s installed you can go to your Xcode project directory and create a file named PodFile:
platform :ios, "6.0"
pod 'AFNetworking', '2.0.2'
This file tells CocoaPods that you want the dependency called “AFNetworking” and that your project requires iOS 6.0. This way if a dependency requires a later version of iOS than your project’s minimum iOS version, CocoaPods will tell you.
Now run this simple command that will fetch the dependency and attach it to your Xcode project.
pod install
Next to your current MyCoolProject.xcodeproj file, CocoaPods created a workspace file, called MyCoolProject.xcworkspace. From now on you need to open the workspace instead of the project file, which includes your project as well as the CocoaPods dependencies.
Can this get any easier?
The answer is yes! AppCode recently added support for CocoaPods! AppCode helps you create the PodFile using autocompletion and you don’t have to go to the Terminal anymore to install the dependencies! (a.k.a “pods”)
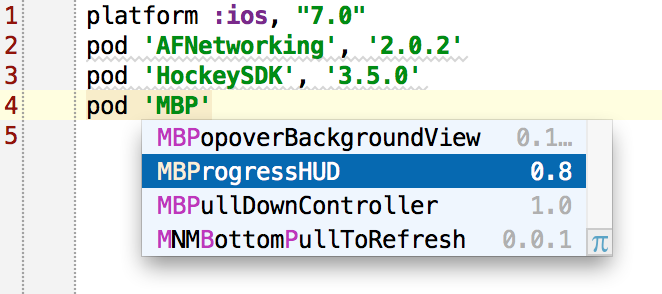
It will even install CocoaPods for you if you don’t have it installed on your system yet. This saves you a trip to the Terminal to run the “gem” command.
Where do the pods come from?
All pods are stored inside a single Github repository: https://github.com/CocoaPods/Specs. Fork this repository and submit a pull request if you want to add your own pod! I did it a few times myself and the pull requests are usually accepted within a day, most of the time even within a couple of hours.
Continuous integration
![]()
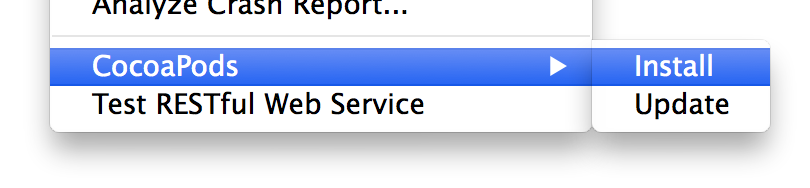
Simply install the iOS Builder plugin into Jenkins. (download the “.hpi” plugin file here) Jenkins of course has to run on a Mac server.
Features:
- CocoaPods support (woohoo!)
- Code signing
- Packaging
- Easy configuration
Alternatives continuous integration systems you could take a look at:
- Xcode continuous integration. I tried this one as well. It is very easy to setup but I found it to be a bit limiting. But it is the Apple supported way to do continuous integration, so it is worth a try!
- Travis CI, which is an online continuous integration solution which integrates well with your Github repository, and it supports Cocoapods! I haven’t tried this one yet.
Distribution
While developing an iOS app, you might want to involve testers or just random people you want to show off the app to. As you might know, Apple provides an alternative to distributing your app to the App Store which is made specifically for this purpose. It is called “AD-HOC” distribution. This is basically a way to sign your app against up to 100 devices and make it available to those devices via a URL. You could simply set up an Apache server somewhere and upload the required HTML and IPA (app binary) to it and send people the link to the HTML page. But you will soon find out this is a drag to do each time you want to deploy a new version.
Also, your testers might encounter crashes and you would really like to see the crash reports (stack traces) to debug the issue. If you want to do this without any help, you will need to ask the tester to connect his iPhone/iPad to iTunes, retrieve the crash reports and send them to you. This is far from ideal. And what if you receive the crash reports from the testers? With iOS you won’t be able to decipher them unless you saved the “dSYM” file that was produced when you built the AD-HOC binary. Oops, you threw it away!
So to sum up you need some kind of mechanism to make it easy to:
- Distribute your app to testers and other interested people
- Gather crash reports
- Automatically save dSYM files
TestFlight
 Well, luckily there are services available online to help you with these things, and more! The first one I ever used was TestFlight
- Supports iOS & Android
- Divide testers into groups using “teams”. For example a different team for each app
- Provides a desktop client that makes it easy to upload your IPA and dSYM files
- Has an SDK to automatically upload crash reports and to do analytics
- Has a mechanism to let testers provide feedback from within the app
- It is free!
After using it for a while I found it has a few shortcomings: the crash reporting functionality is unreliable, I hardly find any crash reports in the backend while I know there are many more. Also the TestFlight website can be kind of confusing, and it is a hassle to sign up new testers.
HockeyApp
 Nowadays I use a different service called HockeyApp. A strange name, but especially for distribution and crash reporting it works way better and easier. This is why I like HockeyApp in favour of TestFlight:
- Has (as far as I know) all the features TestFlight has
- It actually saves every crash that occurs
- It asks the user wether to send the crash report or not
- It groups the crash reports to easily see the different kinds of crashes, and how often they occur
- Unfortunately it is not free, but also it is not very expensive ($5 a month for 5 apps)
I definitely recommend HockeyApp.
To be continued
In this blog I showed you what I think are currently the best tools to use for developing iOS apps. In the next blog I will go more into the actual code by highlighting the frameworks I recommend. I know it’s a cliche to say, but: stay tuned!