iOS Development Tips & Tricks – Part II
To continue my previous blog, iOS Development Tips & Tricks – Part I, in which I explain what tools I think are best to use for iOS development, I want to dive more into the actual code and tell you about my most used and therefore favourite frameworks in iOS.
Core Animation
My all time favourite framework is Core Animation, which is part of the standard iOS SDK. It is the framework that UIKit sits on top of, which you will need to build your user interface. So everything you see on screen in any (non game) app passes through Core Animation, whether it uses animation or not. This is why animation works so seamless and smooth on iOS, it is deeply integrated in all of it’s UI. Instead of it being an after thought, like it appears to be the case on other platforms.
Built in UIKit animations
Doing custom animations in iOS using Core Animation is simple and yet very flexible. But before I get into that I have to tell you that most of the time you won’t need custom animations at all. A lot of UIKit transitions already include animation by default. For example, this one simple line of code produces the transition you see on the right:
[navController pushViewController:controller animated:YES];

This one pushes a new view controller onto the navigation stack. When passing YES as the “animated” argument, the new controller slides in from the right while the navigation bar on top stays in place and changes it’s title (also animated).
Another example, this presents a controller modally on top of the current controller, animated:
[self presentViewController:controller animated:YES completion:nil];
This scrolls a UIScrollView to the desired position, animated:
[scrollView scrollRectToVisible:CGRectMake(0, 0, 100, 100) animated:YES];
And one last example, this one switches on a UISwitch, animated:
[uiSwitch setOn:YES animated:YES];
Custom animations
If you want to perform custom animations you have two options. The simplest option is to use the UIKit abstraction for custom animations. The idea is simple. You just change the properties you want to animate on any view and Core Animation takes care of animating those changed properties. For example, this fades in a view and takes half a second:
view.alpha = 0.0f;
[UIView animateWithDuration:.5f animations:^{
    view.alpha = 1.0f;
}];
So all that this code does is change the alpha property from 0 to 1 in an animation block. Core Animation animates this property by default with a standard ease-in/ease-out curve.
The somewhat verbose but much more flexible option is to use the low-level Core Animation API. This example has the exact same effect as the previous example:
view.layer.opacity = 0.0f;

CABasicAnimation *fadeInAnimation = [CABasicAnimation animationWithKeyPath:@"opacity"];
fadeInAnimation.duration = 0.5f;
fadeInAnimation.toValue = @(1.0f);
[view.layer addAnimation:fadeInAnimation forKey:@"myFadeInAnimation"];
Notice that you don’t animate the UIView here, but instead the “layer” property of the UIView is used to animate. The layer is of type CALayer which a UIView sits on top of. Also, the property on a layer to influence the transparency is called “opacity” instead of “alpha”, which was a property of UIView. So instead of interacting with UIKit, we’re now interacting with Core Animation directly. This allows us to perform much more fine grained animations. In the above example CABasicAnimation is used, but there are many more types of animations and much more options you can configure than with the UIKit example. Also with Core Animation it is possible to turn your own custom properties into animatable properties. But in my experience, I hardly ever had to use the low level Core Animation API and could do most of the animations with UIKit. But it is good to know that this is also an option.
Networking
Most apps don’t stand alone. Apps often need to communicate with the outside world through HTTP. Maybe it is an RSS feed you need to parse to display a news feed, or it is a custom REST API you implemented to share data with other users of your app for example. So you will need to use networking API’s to accomplish this.
The iOS SDK has networking and JSON parsing built in. But using this will not let you end up with very nice code. This example uses the native API’s to asynchronously call a HTTP URL and parse the JSON response:
NSURLRequest *request = [NSURLRequest requestWithURL:[NSURL URLWithString:@"http://example.com/api"]];
NSURLConnection *connection = [[NSURLConnection alloc] initWithRequest:request delegate:self];
On top of that you have to implement the delegate methods:
- (void) connection:(NSURLConnection *) connection didReceiveResponse:(NSURLResponse *) response {
    _responseData = [[NSMutableData alloc] init];
}

- (void) connection:(NSURLConnection *) connection didReceiveData:(NSData *) data {
    [_responseData appendData:data];
}

- (NSCachedURLResponse *) connection:(NSURLConnection *) connection willCacheResponse:(NSCachedURLResponse*) cachedResponse {
    return nil;
}

- (void) connectionDidFinishLoading:(NSURLConnection *) connection {
    NSError* error;
    NSDictionary* json = [NSJSONSerialization JSONObjectWithData: _responseData options:kNilOptions error:&error];
    if (error) {
        // TODO: Handle JSON parse error
    }

    NSArray* items = [json objectForKey:@"items"];
    // TODO: Do something with the items
}

- (void)connection:(NSURLConnection *)connection didFailWithError:(NSError *)error {
    // TODO: Handle a failed request
}
As you can see, you have to implement lots of callbacks, just to handle a single HTTP response. Far from ideal. Luckily a smart guy named Matt Thompson created an iOS framework called AFNetworking which makes things way simpler. AFNetworking is available as a pod (see “Cocoapods” in part 1 of this blog):
pod 'AFNetworking', '2.2.1'
Using AFNetworking, all of the above example code can be replaced with this:
    AFHTTPRequestOperationManager *manager = [AFHTTPRequestOperationManager manager];

    [manager GET:@"http://example.com/api" parameters:nil success:^(AFHTTPRequestOperation *operation, id responseObject) {
        NSArray* items = [responseObject objectForKey:@"items"];
        // TODO: Do something with the items
    } failure:^(AFHTTPRequestOperation *operation, NSError *error) {
        // TODO: Handle a failed request or JSON parse error
    }];
The HTTP call is still handled asynchronously, but instead of delegate methods it uses blocks and a lot less code. Also the JSON is automatically parsed for you. Next to this, AFNetworking has tons of other features. Like multipart file uploads, file downloads, batch requests and so on. It even provides a “network reachability manager” that can determine if there is no internet available for example. So you probably know by now why this is the most popular iOS framework at the moment.
Progress indicator
In addition to networking, you might need some kind of indicator that you are loading stuff from the internet. This way the user knows the app is really doing something. Without any indication, the user will think the button they pressed did not do anything, or that the app crashed. I usually end up using MBProgressHUD, which contains all sorts of progress indicators in different shapes and sizes.
Of course this framework is available as a pod:
pod 'MBProgressHUD', '0.8'


It is quite easy to open the progress indicator:
[MBProgressHUD showHUDAddedTo:self.view animated:YES];
And to close it all you have to write is:
[MBProgressHUD hideHUDForView:self.view animated:YES];
Done!
Data persistence
To persist your data in an iOS app you have the SQLite database at your disposal. Unfortunately to use this database you have to use a really low-level API written in C. Also it doesn’t provide any object mapping or object oriented way to build your queries. This is where the built in iOS framework “Core Data” comes in. It provides an abstraction over the datastore. You could use SQLite underneath but it is easily replaced by other data store types like an iCloud data store for example.
Some features off the top of my head:
- Provides object mapping
- Offers an alternative to SQL, which is more object oriented. You can use predicates, sort descriptors, fetch requests and stuff like that, all constructed as objects. It makes your querying code more readable as opposed to all sorts of string concatenations to construct an SQL query.
- Provides a mechanism to migrate your schema. It contains automatic migration (for example when you add a column) or custom migration you can implement yourself (when the migration isn’t that straight forward).
- It supports iCloud, so it is relatively simple to create a data store that is backed by an iCloud store to sync across devices
To give you an impression of what Core Data code looks like, here is an example of a Core Data query that finds all “Products” for a certain category sorted by price, descending:
NSFetchRequest *request = [NSFetchRequest fetchRequestWithEntityName:@"Product"];

request.predicate = [NSPredicate predicateWithFormat:@"category = %@", category];

request.sortDescriptors = @[[NSSortDescriptor sortDescriptorWithKey:@"price" ascending:NO]];

NSError *queryError;
NSArray *products = [managedObjectContext executeFetchRequest:request error:&queryError];
To insert a new Product using Core Data:
NSEntityDescription *entity = [NSEntityDescription entityForName:@"Product" inManagedObjectContext:context];

Product *product = (Product *) [[NSManagedObject alloc] initWithEntity:entity insertIntoManagedObjectContext:context];

product.title = @"Nike Shoes";
product.price = @(29.95);
product.category = @"Clothing";

NSError *error;
[managedObjectContext save:&error];
Storyboard
It is usually a good idea to utilize Storyboard. This is a built-in feature of Xcode that allows you to not only design your user interfaces by dragging and dropping stuff, but you can also define the interactions between different screens with ease.
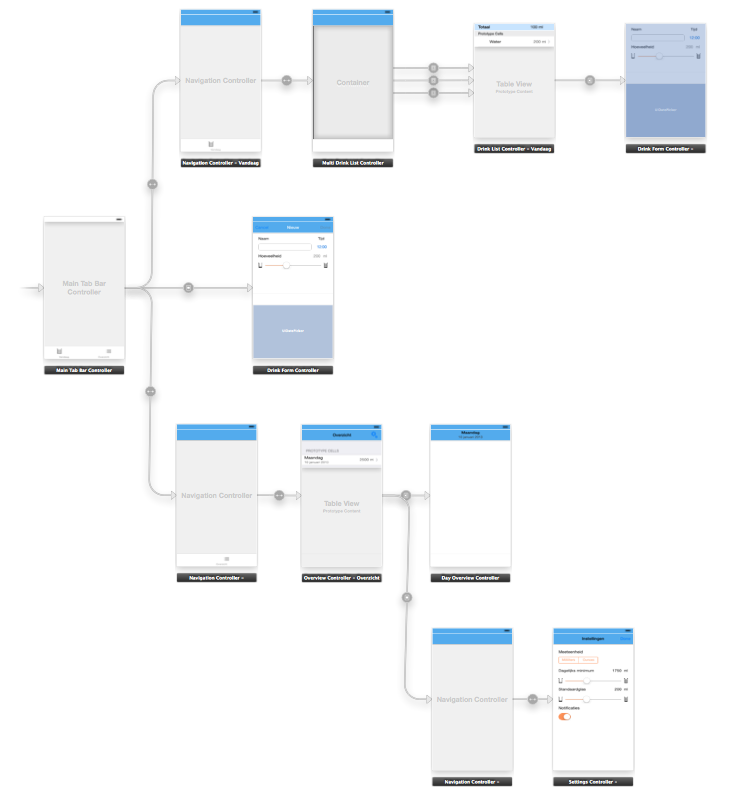
See the example at the top of the blog where I initiated a transition between a list and details screen by pushing a controller on top of the stack of a navigation controller. In storyboard this can be accomplished with one simple drag from one controller to another. Not a single line of code required!
I don’t recommend Storyboard for all kinds of apps. For example if your app has a lot of custom styling which you need lots of additional code for to get right, Storyboard gets in the way very fast. But if your app only uses native components which you simply customized a little by configuring stuff like custom tint colors, font sizes, etc, Storyboard is your friend!
Prototyping
Next to using Storyboard to help you develop an app, it can also be used to quickly create a prototype for an app idea. One time I managed to create a prototype containing 10 screens within a single day with Storyboard and a few lines of code. It helped the customer to see what his idea would look like as an iOS app and easily get a feeling for it. This prototype could quickly be adjusted to his specific requests, before actually implementing the app.
That’s all!
That’s all I wanted to share with you today, I hope you enjoyed reading it. Also I hope that you learned something from it which you can use in your own projects.