iOS perspective on mobile development with Xamarin
One of the fundamental mantras of software development is DRY – “Don’t repeat yourself”. It’s an important rule, because it allows us to save both space and time. Instead of rewriting a non-trivial algorithm, we use a method call, instead of correcting bugs in multiple places, we do it only in one. Would you ever not follow DRY? Well… yes, when you need to develop a mobile app. If your plan is to get as many customers as possible, releasing an iOS and Android version is a must. This means maintaining two very similar codebases. Can we do better? The answer is yes and it’s called Xamarin. It’s the platform we’re using for some of our newest projects here at Trifork, and we would like to share with you our experiences, likes and dislikes. Read on if you’re not afraid to abandon Xcode and Objective C.
What is Xamarin and why would you use it?
Xamarin is a San Francisco based software company leading the open source project called Mono. One of the goals of Mono is to provide cross-platform runtime for Microsoft .NET applications.
The Mono framework served as a basis for the mobile development tools offered by Xamarin: Xamarin.iOS and Xamarin.Android. As a developer opting in for the former, what you get is, amongst others, the following:
- C# compiler
- Core .NET libraries
- Libraries that bind the native CocoaTouch APIs
- Xamarin Studio IDE
As the first item on the above list indicates, using Xamarin means saying goodbye to the good old Objective C. That is, in my opinion, a good thing. C# is a very modern language offering a lot of features that are also available in Swift. As for all the great frameworks we get to use, while developing iOS apps – they are all there! It’s true that some naming conventions are a bit different but most of the time you’ll feel very much at home.
Developing in C# is definitely a plus but the greatest benefit Xamarin has to offer is sharing code between multiple platforms. Unfortunately this does not mean, that we have found the Holy Grail of mobile development, which allows us to write code once and run anywhere. The promise that we get is, nonetheless, very attractive. Xamarin lets us to share the majority of our non-UI codebase. If you want more you can take a look at Xamarin.Forms, which aims at providing common API for writing UI code! We decided not to use it in our projects due to quite complex and custom UI, as well as the fact that the API does not offer all the native features 1.
Getting started
It’s important to mention that Xamarin is not free. Depending on your needs, a single annual license will set you back between $300 and $1900. The price includes only one platform, so if you want to target both iOS and Android, you have to multiply it by two. This may seem like a lot, especially when you realise that you need the usual Apple and Google developer licenses on top of that. But if your project is big enough and contains a substantial amount of business logic, then you can probably get your money back by reducing the development time.
The IDE
Xamarin supports two development environments: Xamarin Studio and Visual Studio (only Business and Enterprise license). While you cannot choose which one you want to use if you have a Mac, it is possible to run both on a Windows machine. We decided to use Xamarin Studio across the board, mainly to minimise any sorts of incompatibilities.
An added bonus for developers coming from the iOS/Mac world is that Xamarin Studio looks a lot like Xcode.

We have the familiar Run button in the upper left corner, the device selection dropdown as well as the notification bar in the middle. One difference between Xamarin Studio and Xcode, that I was really happy to see, is the Solution Navigator. In contrast to Xcode, it actually reflects the structure of directories on disk, not only the contents of an XML file. I’ve spent way too much time trying to keep both of them in sync.
My overall experience, after using Xamarin Studio over the past few months, is positive. It is pretty well organised and fast at launching my apps on a device. That said, I encountered code highlighting issues and my device froze from time to time while connected to the debugger (usually after the screen has been locked for a short while).
As far as designing UI is concerned, Xamarin offers a tool called Xamarin Designer, which allows you to edit storyboards in very much the same way as Interface Builder. I have not used it a lot, to be honest, because it is also possible to stick to our good, old friend IB. It’s really cool that Xamarin automatically picks up the changes you make to a Xib file and new outlets are immediately available in your classes. The only annoyance I encountered was problems in communication between the two IDEs, which result in pesky pop-ups you have to dismiss from time to time.
The language
I must admit that I like C# more and more. It’s a powerful language that boasts a number of very useful constructs. Generics, lambda expressions, optionals and properties, just to name a few. Plus it’s actually quite easy to get the hang of it, especially if you have some experience with Java.
One thing that may be unusual for people moving to C# from Objective C, is the use of exceptions. In iOS apps this practice is almost non-existent, while in .NET it’s a very important and integral part of the language. This means no more error codes and error objects. Instead it’s time to get familiar with the try, catch and finally keywords.
Memory management in C# is very different than in Objective C, because of the presence of a garbage collector. Despite that, one thing to be aware of, is that it is still possible to create a retain cycle, for example when using lambda expressions. The reason for that is that the classes that derive from NSObject still work with reference counting under the hood.
Speaking of memory management, it is very important to understand and use the Dispose pattern. It allows you to release memory in a more deterministic way, instead of waiting for another garbage collector pass. UIImage serves as a good example. The object representing an instance of UIImage uses only 20 bytes of memory, but it contains a pointer to the raw image data, which can be megabytes in size. The garbage collector sees only the negligible 20 bytes, so it can take a long time before another GC pass will be triggered. By that time we may have run out of memory and ended up evicted by the system.
The frameworks
The amazing thing about Xamarin is, that even though you’re using a totally different environment and language, you still have all your familiar APIs available at your fingertips. This makes your transition from Xcode and Objective C smooth and fast. You have to be aware of certain naming differences and the C# conventions, though.
Let’s take for example Core Image. The iOS framework defines string keys that allow you to set properties on filters that you want to apply to an image. They are all grouped into a long list in CIFilter.h. Xamarin goes a little bit further by defining a static class CIFilterInputKey, which contains static properties representing different keys. In my opinion, this makes it easier to find the one you’re looking for.
If you decide to use UITableView in your project, you may be surprised that UITableViewDelegate and UITableViewSource are classes, not interfaces. This is because interfaces in C# are mandatory, whereas Objective C offers the @optional keyword. It is therefore much easier to create an abstract base class, so that subclasses can override the optional methods they need. This, in turn, results in the fact that it is not possible to make your controller the delegate or the data source. To do that ,you have to implement the IUITableViewDelegate and IUITableViewDataSource interfaces. They contain only the mandatory methods. The optional ones can be implemented as follows:
[Export(“numberOfSectionsInTableView:”)]
public int NumberOfSections(MonoTouch.UIKit.UITableView tableView)
{
 ...
}
The Export keyword is used to make sure that the Objective C runtime sees your NumberOfSections method as the numberOfSectionsInTableView: method declared in the UITableViewDataSource protocol.
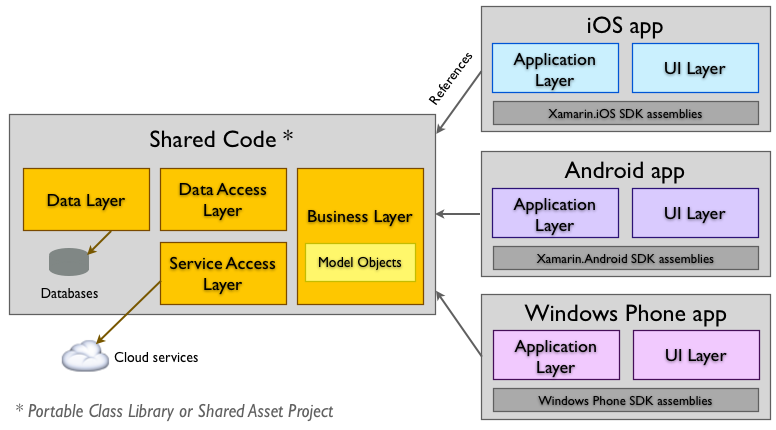
What it’s all about: sharing code
The greatest advantage you get by choosing Xamarin for your next project is definitely code reuse. The following chart illustrates very well which parts of a codebase can be shared:
Xamarin offers two approaches to sharing your code between multiple platforms: Shared Project or Portable Class Library. The former works in a very simple way. After creating a Shared Project you can make it a dependency of an arbitrary number of other projects, for example iOS and Android. This ensures that all files added to the Shared Project will be included in all projects that depend on it. A consequence of this is, that you need to use compiler directives if you want to include platform specific code in your Shared Project. Here is a quick example:
#if __IOS__
nsDispatcher.BeginInvokeOnMainThread(NotifyListeners);
#elif __ANDROID__
Dispatcher.RunOnUiThread(() => NotifyListeners());
#endif
Since the above code is compiled separately for iOS and Android the compiler can figure out which line should be used.
Portable Class Libraries work in a fundamentally different way. They are compiled as a separate target and only then included in other projects. When creating a PCL project, you need to specify which platforms you want to be able to run it on. Moreover, you will not be able to reference platform specific libraries or use some of the classes available in Xamarin.iOS and Xamarin.Android.
With the two Xamarin project running parallel at the moment, our strategy has been to place as much code as possible in a PCL. We wanted to avoid using compiler directives too aften, as this can become difficult to maintain over time. Here is a summary of the projects in terms of lines of code.
| Project 1 | Project 2 | |
|---|---|---|
| iOS | 5212 | 5077 |
| Android | 5914 | 3172 |
| Shared | 2244 | 2807 |
| Shared % | 17% | 25% |
As we can see, we’re able to share 17% of our codebase in Project 1. We’re expecting this number to go up, as we’ve been focusing a bit more on the UI, than on the code that we actually can reuse between platforms.
Lines of code do not paint the whole picture, though. Sharing code makes it is easier for us to discuss certain areas of our projects, especially those related to data persistence and networking.
Sharing assets
After starting our first Xamarin projects at Trifork we immediately identified strings and colours as great candidates for sharing between platforms. Unfortunately we were unable to find good, coherent solutions to this problem. Two of my colleagues decided to build a tool that would let us store the above-mentioned assets in one place, so that they are always in sync on all platforms. They named it Tirfork Xamarin Localization and it will soon be available for download, as a Nuget package, via the Xamarin package manager.
The way the tool works is very simple. It gets executed as a part of the build process and it generates assets for both Android and iOS, based on an input CSV file. For example, if we take iOS, what we get is Localized.strings files and a class containing static properties representing colors. The input files can even ba placed in Google Drive, which should ease cooperation with the translators.
Profiling tools
Profiling Xamarin applications can be done using two different tools: Mono HeapShot and the already known to iOS developers Instruments. The below screenshot presents the former in its full glory.
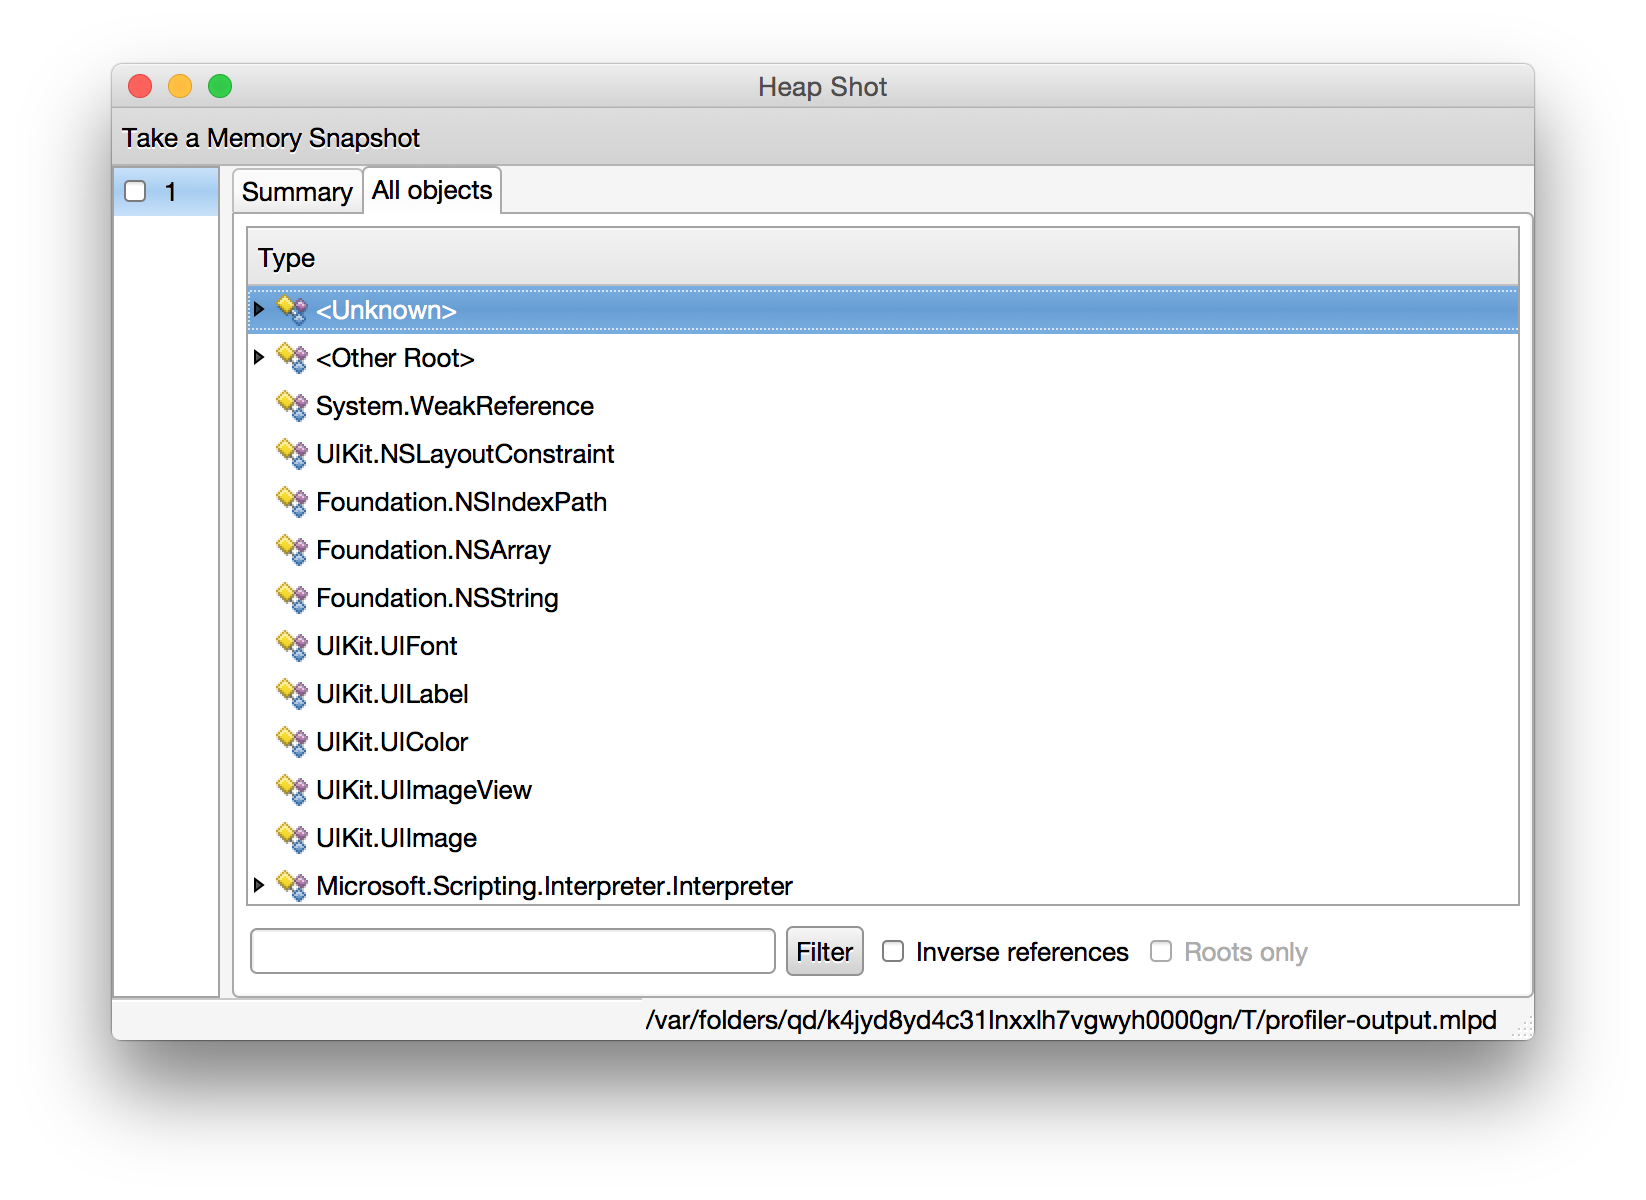
As you can see the interface is quite rudimentary. The tool offers both memory and performance analysis. Unfortunately generating a snaphost of the application’s memory takes quite a long time, which can quickly get on your nerves. On the positive side, it is possible to select one of the generated snaphosts and compare it to any other snapshot. What HeapShot does, is show you the diff i.e. all the objects created between the two selected snapshots.
I was not able to get the performance analysis part of HeapShot to work, which just confirms that it’s better to stick with Instruments. While you won’t find a way to launch it through Xamarin Studio, there is nothing in the way of attaching Instruments to a running app built with Xamarin.
Continuous integration
Continuous integration with Xamarin is a rather painless affair, especially if you choose to use Jenkins on a Mac build server. That is what we decided to do and we managed to get up and running in no time. You use a program called mdtool to build your Xamarin project from command line. The command itself looks like this:
/Applications/Xamarin\ Studio.app/Contents/MacOS/mdtool -v
build “--configuration:Release|iPhone” app/MyAwesomeApp.sln
It seems to be pretty easy but you have to remember that Jenkins needs to be able to access the keychain and your signing certificate. Otherwise the build will fail. Unfortunately we were not able to configure the project in a way, that would allow us to build the app without code signing. This is not ideal, because it requires us to update certificates stored in the build server’s keychain, instead of placing them in the repo, alongside other resources. As a result, we had to resort to the following command that unlocks the keychain:
security unlock-keychain -pPASSWORD ~/Library/Keychains/login.keychain
If you also feel like making a build without code signing could be useful, please upvote our feature suggestion on the Xamarin website.
One last thing worth mentioning, is the fact that you do not need a separate license to be able to build Xamarin projects on your CI machine. You have to sign a special addendum to the contract, though. This requirement is mentioned in the FAQ on Xamarin’s website.
Third party libraries
Xamarin offers a great way to manage third party libraries called NuGet. It’s a package management system for .NET, which is tightly integrated with Xamarin Studio. You can search a repository of more than 37,000 libraries right from the IDE. But coming from iOS, you may be wondering whether you can use all those awesome projects available through CocoaPods. Sadly, it’s not possible to use them directly. You have to go through the process of creating a so called binding project. This requires you to take the project you want, for example AFNetworking, build it into a library (with the .a extension) and create a bunch of C# files which map the Objective C API into a corresponding C# API. I haven’t tried it myself, but it doesn’t seem to be a very straightforward process and can certainly take a lot of time. This issue is addressed by Objective Sharpie, a tool that generates bindings automatically. The disadvantage is, that you have to have a pretty good knowledge of how the library you want to bind works, and how to build it.
Closing thoughts
I have spent only two months with Xamarin, but my impression is already very positive. It offers you an environment that feels very familiar and is very easy to get used to. C# is pleasure to work with and it improves on many areas compared to Objective C. It’s great that you can still use Instruments to profile your apps. But most of all you get to reuse quite a lot of code.
As far as cons go, I would like to see more Objective C libraries ported to Xamarin and fewer annoying bugs in Xamarin Studio.