Linux homedir encryption
ZFS features (excerpt)
- Snapshots and clones. Useful for e.g. docker and system backups.
- Copy-on-write (making snapshots initially zero-cost).
- Raid.
- Encryption.
- SSD caching.
See more on the ZFS wiki page (features) or this reddit post.
Ubuntu has released Focal Fossa (20.04) and as I had just acquired my new laptop, I decided to test it out. Getting a software uprade is always fun; it is always exciting to discover new features (and bugs 😖) and see what’s been changed.
One of the new features in Focal Fossa is improved ZFS support; it is now possible to use it / enable it right from the installation of Ubuntu. Great ✋. I wanted to give it a go (looking forward to features such as built-in raid support and snapshots) but unfortunately it clashed a little bit with my need to encrypt my home directory.
Motivation
Writing this blog post in an IT professional setting, it may be obvious why you would encrypt (part of) your disk. It is a basic matter of respecting your customer’s data. However, if you read this as a private person, there might still be good reasons to go through the trouble:
- While we don’t have private key files for our net banking and government related sites any-more [1], But we have a mobile app for it instead. Perhaps we should pay a bit of attention to security on those devices as well…! I still have SSH-keys for technical accounts on the net, and for my personal server. And who knows what a skilled hacker could gather in terms of personal information from my web browser cache!?!?
- If my laptop got stolen, I would also like to know that the thief could not readily browse through my personal data (mails, photos, documents, etc.). I believe it is similar to when burglars breaks in to homes: It is not a nice feeling to know that some random stranger has been rummaged through your personal belongings.
Lastly – and this might not apply to you – Why not? I’m a geek and it’s fun 🙂
While this post about home directory encryption in a setting of ZFS (and its built-in support of encryption), the general approach may also be of interest to you if you run ext4 and/or other disk encryption tools.
Overview – What is the challenge?
The main challenge is two fold:
Ubuntu 20.04 did not provide an option to encrypt your home directory when using ZFS
Ubuntu did previously provide this option, but it used eCryptfs which was considered buggy, under-maintained, [and] not fit for main anymore and has thus been removed.
When enabling encryption manually (after installation) the decrypt action is performed before user login
The issue arises because ZFS is configured (on Ubuntu 20.04) to automatically mount all file systems on the system at boot time – including encrypted home directories. GDM has support for asking for passwords, and hence a prompt appears at boot time. This is great for system wide storage, but not so great for user directories.
PAM to the rescue
PAM is a authentication system that allows programs that rely on authentication to be written independent of the underlying authentication scheme. I.e. if GDM need to authenticate me as a user, it (GDM) can be agnostic about whether my password is in a file on the hard drive or is validated against an AD on the network.
PAM is the Pluggable Authentication Module system in *nix world. If you don’t know it, don’t worry. Neither do I. It is a complex system and I have not had the time (or urge) to really dig in to it other than what I needed here:
We can use PAM to get a hold of the user password when logging in, and in turn use the password to unlock our home directory storage.
So… what we are going to do is:
- Migrate the home directory from an unencrypted home directory to an encrypted one.
- Write a small Bash script to assist us in unlocking our home directory.
- Set up PAM to use the Bash script.
- Configure properties (used in the unlock script) on our ZFS volume.
Warning – Here Be Monsters
Before you continue, let’s just align expectations for a moment. The following guide has been written with the following assumptions in mind:
If you continue on this journey with me, then I will assume that you…
- Know your way around your Linux system.
- Have the basic knowledge of ZFS (at least read the ZFS man page. Or skimmed it. Or… you know… have heard of it).
- Know your way around Bash scripting.
Here Be Monsters. Messing around your filesystem may lead to data loss. Do back up your data. Proceed at own risk.
Step 1: Migrating the data
It is not possible to encrypt an existing dataset (filesystem) in ZFS once it has been created. Instead one has to make a little (fairly straight-forward) dance to create a new dataset (encrypted right from the beginning) and then move the data.
The command snippets below are examples from my own system; remember that you need to adapt the paths as you go.
- Create a temporary admin user.
- Log out of your normal user and log in with the temporary admin user.
- Move the mount point of your normal user homedir:
sudo zfs set mountpoint=/home/jvc_nonenc rpool/USERDATA/jvc_tdssc
Note, hererpool/USERDATA/jvc_tdsscis the existing un-encrypted dataset for my home directory, created by the Ubuntu installation. - Creat a new encrypted home directory:
sudo zfs create -o encryption=aes-256-gcm -o keyformat=passphrase -o keylocation=prompt rpool/USERDATA/jvc_enc -o mountpoint=/home/jvc
Important: Use your normal user password for this encryption, otherwise you won’t be able to decrypt the storage automatically when you log in. - Set ownership of new home directory:
sudo chown jvc:jvc /home/jvc - Copy data from old home directory to new:
sudo -u jvc rsync -ar /home/jvc_noenc/ /home/jvc/ - Make a mental note to clean up (remove) the temporary user and old home directory when all is set and done.
I did the dance and rebooted my computer, and got (as expected) this:
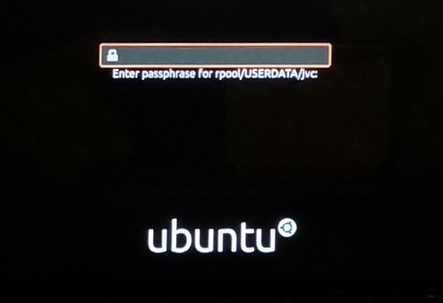
So yes, my home directory was encrypted. Great. But as expected, I now have to enter my password twice: Once during boot for unlocking the storage, and then once more for logging in to the system. This is an issue for me in two ways:
- I just dislike having to enter my password twice.
- If I share my computer (could be a co-worker; could be my girlfriend on my personal computer) then he/she would not be able to do so without me entering my password at boot time.
Fair enough… most of the time I don’t shut down my computer but only suspends it (like everyone else)… but still…
Step 2: Writing the unlock-mount script
I will just show the script I use here. Assuming that you know how to read Bash, the content is fairly clear (and comments are provided in the code). The properties canmount and dk.talldanestale.automount:user will be explained in step 4.
Save the script to /sbin/mount-zfs-homedir and remember to set the executable bit:
#!/bin/bash

set -eu

# Password is given to us via stdin, save it in a variable
# for later
PASS=$(cat -)

# List all zfs volumes, listing the *local* value of the
# property canmount.
zfs get canmount -s local -H -o name,value | while read line; do
    # Filter on canmount == 'noauto'. Filesystems marked 'noauto'
    # can be mounted, but is not done so automatically during boot.
    canmount=$(echo $line | awk '{print $2}')
    [[ $canmount = 'noauto' ]] || continue

    # Filter on user property dk.talldanestale.automount:user.
    # It should match the user that we are logging in as ($PAM_USER).
    volname=$(echo $line | awk '{print $1}')
    user=$(zfs get dk.talldanestale.automount:user -s local -H \
           -o value $volname)
    [[ $user = $PAM_USER ]] || continue

    # Unlock and mount the volume
    zfs load-key "$volname" <<< "$PASS" || continue
    zfs mount "$volname" || true # ignore erros
done
Debug tip: You can change
set -eutoset -euxto make Bash print out all commands as it is executing the script. In order to see the output, you also need to enable debug output in PAM. See next step.
Note: The use of here-string (the<<<operator) instead ofecho "$PASS" | ...prevents your password from being written to the log.
Step 3: Set up PAM to use the Bash script.
The approach is to use the PAM module pam_exec.so to pass on the user password to an unlock-script.
The PAM configuration is a set of files residing in /etc/pam.d/. Some files are service specific3 while others are shared (included) by the other files. On my Ubuntu system there is a file named /etc/pam.d/common-auth that is included from other services that enable users to login4. This is the place to add the pam_exec.so hook:
- Edit the file
/etc/pam.d/common-auth: - Add the line:
auth optional pam_exec.so expose_authtok /sbin/mount-zfs-homedir
This line can be read as:
- Set up a hook for user authentication (
auth) … - that is allowed to fail (
optional) … - to run a command (
pam_exec) … - that exposes the password through stdin (
expose_authtok). - The command to run is
mount-zfs-homedir.
That is it for PAM configuration.
Debug tip: If you need to debug things, then adding
debug log=/tmp/file.logwill help you. Example:auth optional pam_exec.so expose_authtok debug log=/tmp/file.log /sbin/mount-zfs-homedir
Step 4: Configure properties on our ZFS volume.
The unlock script used two properties, which we will explain and configure here:
Property canmount
The first (substantial) line of the script lists datasets in the zfs pool along with the canmount property. We filter on values noauto. The noauto value indicates to the system that it should not be auto-mounted during boot (which is the trigger for the password prompt at boot).
In other words: We need to mark our home directory not to be auto-mounted at boot:
sudo zfs set canmount=noauto rpool/USERDATA/jvc_enc
Property dk.talldanestale.automount:user
Next, the script is filtering on a custom property dk.talldanestale.automount:user which I use to indicate to which user this dataset (filesystem) belongs. I do not want to attempt to mount my girlfriend’s home directory using my password.
The property is one I created. The ZFS states that user properties must contain a ‘:’, but otherwise is free to choose. I like the concept of prepending (semi) global properties with organization identifier. Hence the dk.talldanestale.
To set the property, execute:
sudo zfs set dk.talldanestale.automount:user=jvc rpool/USERDATA/jvc_enc
That’s it. I hope it helps you on your journey.
Addendum: zsys automatic snapshots
One of the really nice features of ZFS is the snapshot feature. It enables you to, well, take a snapshot on the fly of the filesystem for later use. Later use could be…
- mounting (read-only) for retrieving lost files.
- rolling back system after a failed upgrade or install of a driver.
- a precautionary backup when you are about to perform actions that could potentially result in data loss.
On Ubuntu there is a hook set up in the apt/dpkg configuration that (via zsys) creates a snapshot of the machine just before installing packages. Unfortunately something broke when I created my new home directory and now I would get the error Couldn't find any association for the user dataset ....
Not knowing anything about zsys or how this was set up on Ubuntu I went spelunking and found the property com.ubuntu.zsys:bootfs-datasets that was set on my old home dataset but (of course) not on my new. So… copying this property fixed the issue:
VAL=$(zfs get com.ubuntu.zsys:bootfs-datasets rpool/USERDATA/jvc_tdssc -H -ovalue)
sudo zfs set com.ubuntu.zsys:bootfs-datasets=$VAL rpool/USERDATA/jvc_enc
All done. Hope it helped you as well!