Meteor – Client & Server Programming in One
In this blog post I want to introduce to you a relatively new JavaScript framework which is called Meteor. The Meteor framework provides the feature to write server and client side code just in HTML 5, Javascript, and CSS. Right now there is just a preview version available (Preview 0.7.0.1), nonetheless this preview version is quite powerful already. Therefore you can find already a number of meteor application on the market. For example, an application called Share with 911, Interview, ApplyBin, etc. In this blog entry, I want to present some of the features such as the how to write server side and client side code. I want to explain what are templates in the meteor framework and how they are used. Additionally I will show you where and how to store static content such as images and other resources. In the end I will give you my own conclusion and a tutorial to help you get started.
Features
Meteor provides its users with some useful features. The most important features are:
- Pure Javascript
- Live Page updates
- Clean, powerful data synchronization
- Latency compensation
- Hot Code Pushed
- Sensitive code runs in a privileged environment
- Fully self-contained application bundles
- Interoperability
- Smart Packages
I am going to explain some of the features more in detail such as the Live Page updates, hot code pushed, and smart packages.
Live Page updates
Meteor makes it quite easy to keep your website up to date for your clients. To keep the website up to date a feature is used called “Live Page Updates”. What does this mean? It means that if the content of the website changes, the user doesn’t need to refresh the page. The page will refresh itself. This means that no clients will have different content, because the feature ensures that the clients always runs the newest version.
Hot Code Pushed
The hot code pushed is a really nice feature. Every developer knows the situation where you have just deployed your awesome new application. But after 2 minutes it turns out there is a bug. The normal way to solve the bug would be to find the bug, fix it, rebuild and then deploy the entire application again. Not with Meteor, with Meteor you can push the modified code directly to the server without the need to deploy the entire application again. That comes in handy if you just want to change one or two lines of code.
Smart Packages
The creators of Meteor also thought about packages that allow you to work with for example jQuery, Bootstrap, etc. They want to allow developers to easily add packages or remove packages to an existent meteor project, and I think they did a good job in it. The current packages which are listed on the Meteor website are:
- accounts-ui (A turn-key user interface for Meteor Accounts)
- amplify (simple cross-browser API for HTML 5 local storage)
- appcache (application cache packages for static content)
- audit-argument-checks (Validation checker for methods)
- backbone (Client-side MVC framework for managing complex data)
- bootstrap (Front-end toolkit)
- browser-policy (Set security-related policies)
- coffeescript (Little language that compiles into JavaScript)
- d3 (Manipulating documents based on data)
- force-ssl (Redirect insecure connections to a secure URL)
- jquery (fast and concise JavaScript library)
- less (extends CSS)
- random (functions for generating random numbers)
- spiderable (allow web search engines to index a Meteor application)
- stylus (CSS pre-processor)
- showdown (Using Markdown in your templates)
- underscore (support for functional programming)
Additionally you can write your own package if you miss a particular one and you can provide it to the community. To add/remove a package just go to your meteor project folder and type in the shell the command “meteor add/remove [package name]”. Now your project supports or unsupports the packages. That was quite easy 😉
Server Code
The server-side code is written in Javascript and is using Node.js in the background. To write code that should be executed on the server, you can use “Meteor.isServer”. That ensures that the code will just be performed on the server side. For example:
if (Meteor.isServer) {
    Pictures.insert({name: "Party 1", category:"party", picPath:"pictures/party/party1.jpeg"});
    ....
}
The above code snippet inserts a new entry in a MongoDB collection which is called ‘Pictures’. This entry has 3 properties which are name, category, and picPath.
Client Code
Client side code is code which should be run solely on the client side. As with the server code, it is indicated with “Meteor.isClient”.
if (Meteor.isClient) {
    Template.allPictures.allPictures = function() {
        return Pictures.find().fetch();
    }
}
The code snippet returns all pictures of a mongo collection with the name “Pictures”. Line one checks if it is client-side code. In line 2 a template function is defined with the name “allPictures”. We will speak more detailed about templates in the next part. Line 3 returns the actual pictures of our collection to the template.
Templates
Templates are an essential part of the Meteor framework. If you don’t provide your code in templates, some of the features such as the live update will not work. Let us take a look at a template and how it works. At first we need to define our template in the HTML page such as:
<template name=”hello”>
    <div class=”greeting”>Hello there, {{first}} {{last}}!</div>
</template>
Nothing special here, except for the first and last and why they are surrounded by curly brackets? You can interpret the {{first}} and {{last}} as placeholder for Javascript code. When you execute the template, you provide the function call with an object that contains the fields with the same name. The corresponding Javascript function to execute the template is:
Template.hello({first: "Alyssa", last: "Hacker"});
This small code snippet contains the values of first and last. The first part “Template.hello” is linked to the HTML code snippet with the word hello. After it is executed, the values of first and last are stored in a JSON object. If the template is visible on the screen it would show the text “Hello there, Alyssa Hacker”.
Public Folder
By default, meteor does not create a public folder in the project. However it is quite easy to create this folder and to put some content in it. The public folder can be used to store static content such as images and other resources. Together with the apache package that can be useful to boost the performance.
Conclusion
Although currently it is just a preview version, the Meteor framework is quite powerful. It combines the struggle between server and client side code. And it is using the features of frameworks such as angular.js. Moreover it has some nice features of its own.
However my own conclusion is that the framework is very useful for small size projects, such as a small web shop or an internet presentation. If the application needs more advanced logic and it is not clear if other features need to be implemented, using Meteor can be a struggle and it might require some hacking to include the features.
A plus point is the documentation of meteor which seems quite complete. If you want to try it, give it a try. Go to www.meteor.com and check it out. Or check the small tutorial below to get started and have fun.
Tutorial / Demo
Let’s start with a small demo. Our goal is to build a website that can be used as an internet presentation of a photograph. The application should contain information about the photograph, the pictures, and a contact person.
1. Download meteor
The download of meteor is straightforward and quite easy. It is the same procedure on mac, linux, or windows machines. You just need to open your shell and fill in the command curl https://install.meteor.com | /bin/sh this command installs the meteor framework in your bin folder.
2. Create Project
To create a project just open the shell and type meteor create myapp. Meteor will create a folder with the name myapp that includes the files.
3. Run the Project
To run the project navigate to the folder and type meteor run. You can visit the project under localhost and port 3000. As you can see, there is not really much to see. Let us add some packages.
4. Adding packages
In the demo we will use the jQuery and bootstrap packages. If you don’t know jQuery or bootstrap, take a look on their websites (www.jQuery.com, www.bootstrap.com). To add both packages direct to your project folder, type meteor add jquery and meteor add bootstrap. Now the meteor project has the jQuery and bootstrap support packages installed.
5. Open the project
It is time to open our meteor application in our preferred IDE. I personally use Intellij but however you can use Netbeans or Eclipse as well. When you open the project you will see that the project contains just three files:
- myapp.css
- myapp.html
- myapp.js
The css file is for styling the page. The html file contains the representation of the data and the js file contains the logic for server and client. Most of the time you will work in the html or javascript file.
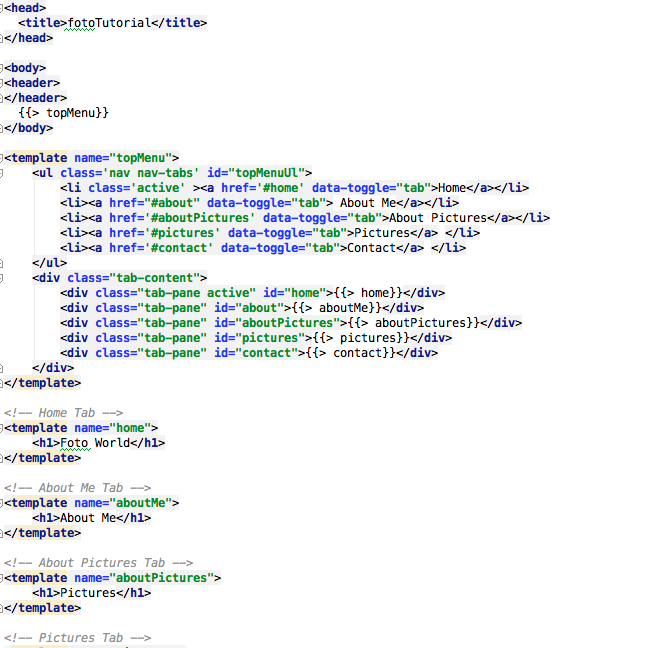
6. Add navigation bar to HTML page
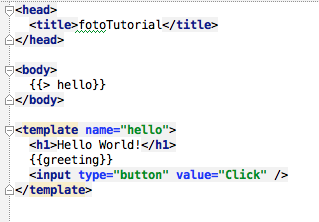
We will start to modify the HTML page. Below is the default page which meteor creates for you. As too see it has a head which includes a title. The body just includes a tag which refers to a template with the name hello. And the template has some text and a button.
The navigation bar component is provided by the bootstrap package. So no need to invent the wheel again ;).
And how does it looks in the browser? Let us take a look.
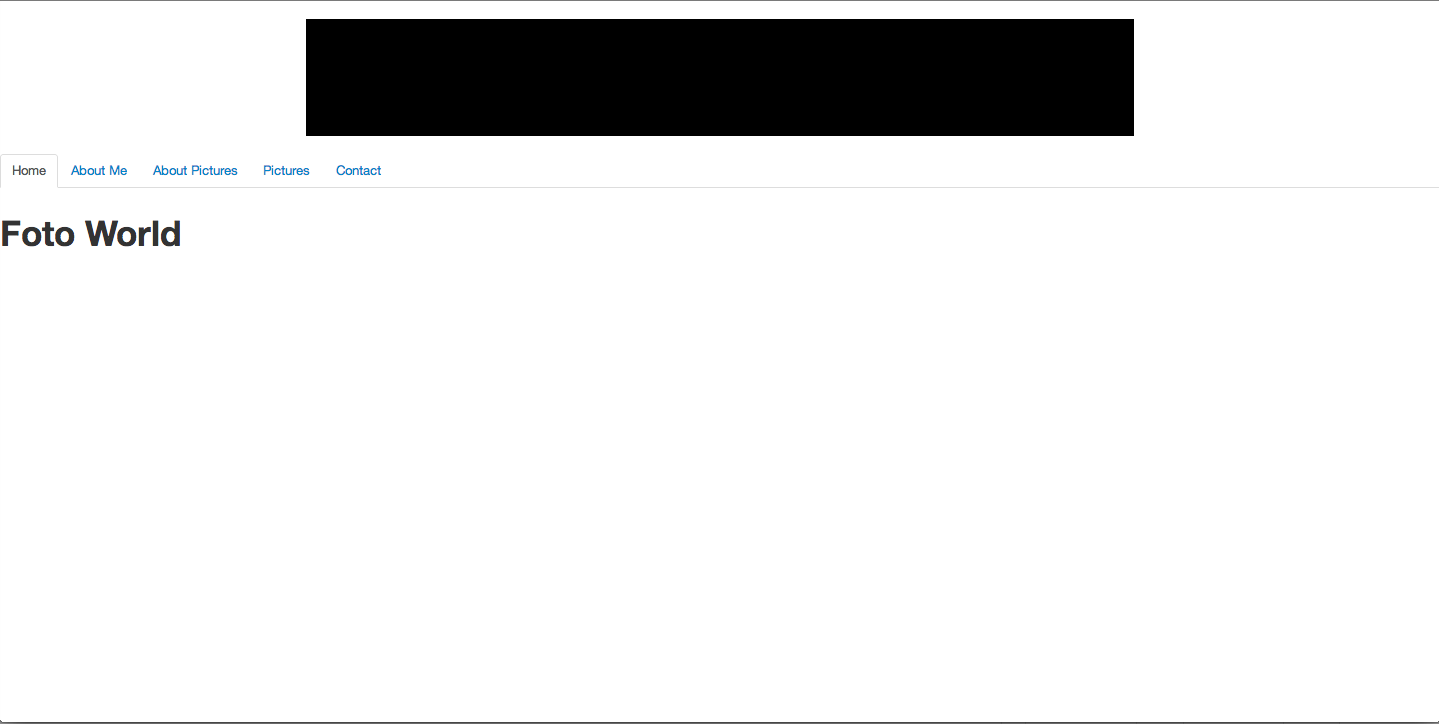
As to see we have a vertical navigation bar with the tabs Home, About Me, About Pictures, Pictures, and Contact. Furthermore it is already possible to navigate between the tabs.
7. Add content in JavaScript
Until now our website is quite empty. So let us add some content to the Home, About Me, About Pictures, and Contact tab. For this we are using the provided template engine of meteor. Let’s take for example the Home tab. The HTML code looks so
<template name=”home”>
    <h1>Foto World</h1>
    {{intro}}
</template>
Wait there is something strange in our template what is the meaning of {{intro}} you will ask yourself. If you are familiar with angular.js, you will know the meaning for the persons that don’t have experience with angular.js or a similar framework, this means greetings in the curly brackets is a placeholder for some Javascript code. Let us inspect the Javascript part for the intro placeholder.
Template.home.intro = function () {
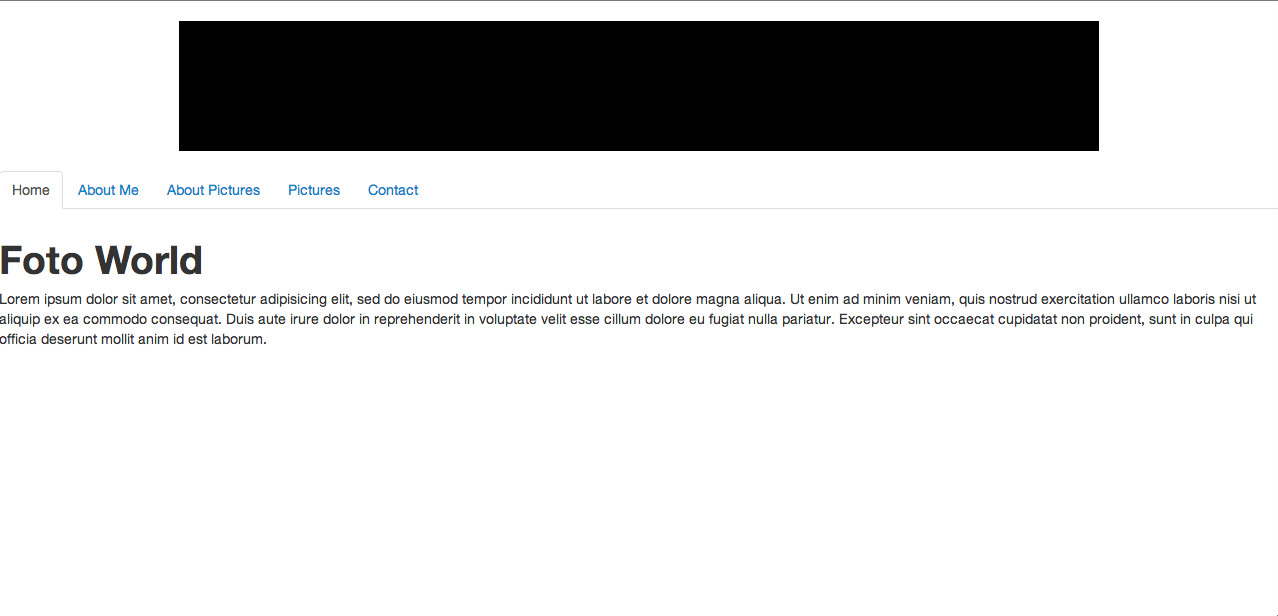
return "Lorem ipsum dolor sit amet, consectetur adipisicing elit, sed do eiusmod tempor incididunt ut labore et dolore magna aliqua. Ut enim ad minim veniam, quis nostrud exercitation ullamco laboris nisi ut aliquip ex ea commodo consequat. Duis aute irure dolor in reprehenderit in voluptate velit esse cillum dolore eu fugiat nulla pariatur. Excepteur sint occaecat cupidatat non proident, sunt in culpa qui officia deserunt mollit anim id est laborum.";
};
This placeholder returns a string. Which will be shown if the template is visible on the screen (see screenshot). The advantage of returning the string in a Javascript function is that when the text changed the client doesn’t need to update his browser to see the new text.
We finish our first view. The views for About me, About pictures, and Contact are similar as the home view.
8. Creating a mongo database and data collections
Now we come to some of the more interesting features of meteor. As mentioned before, meteor is using MongoDB as the default database to store data. We will keep the default database but we are going to add a new collection to it. This collection should contain information about the pictures and the path where they are stored. To use the database it is necessary to include the collection on the server- and client side. Also this is done in Javascript and looks as follows:
if (Meteor.startup) {
    Pictures = new Meteor.Collection("pictures");
}
Meteor.startup ensures that the code runs at the startup of our application. It will run on both server and client side. In the second line we create our collection with name pictures and assign the variable Pictures to it. The next step is to fill our newly created collection with some content. This should be only done on the server side.
if (Meteor.isServer) {
    Meteor.startup(function () {
        Pictures.insert({name: "Nature 1", category:"nature", picPath:"pictures/nature1.jpeg"});
        Pictures.insert({name: "Nature 2", category:"nature", picPath:"pictures/nature2.jpeg"});
        Pictures.insert({name: "Nature 3", category:"nature", picPath:"pictures/nature3.jpeg"});
    });
}
The first two lines ensures that the code will only run on the server at the start up. Line three until five are inserting objects in the created collection. A picture has in this demo three properties the name, the category, and the path where it is stored.
9. Store Images in public folder
As default meteor is not creating a public folder to store data such as images, etc. So let us create one. To do this go to your project and create a new folder called public. In this public folder create a new folder called pictures. This folder will contain our images. Download or take three images and paste them in the pictures folder. Name the three images nature1, nature2, and nature3.
10. Show Pictures on website
To present our pictures in the picture tab, we will use another template which includes a table. The HTML code is shown below:
<template name="allPictures">
    <h1>All Pictures</h1>
    <table border="1" class="table-center">
        <tr>
            <th style="width: 80px">Name</th>
            <th style="width: 80px">Category</th>
            <th style="width: 80px">Picture</th>
        </tr>
    {{#each allPictures}}</span></span></em>
        <tr>
            <td>{{name}}</td>
            <td>{{category}}</td>
            <td><img src={{picPath}} width="80px" height="50px"/></td>
        </tr>
    {{/each}}
    </table>
</template>
The first row gives our template a name. In this case it is allPictures. The second row is some text. In the third row until row fourteen our table is declared. But wait what is the meaning of {{#each allPictures}}, {{name}}, {{category}}, {{picPath}}, and {{/each}}. The {{#each allPictures}} and {{/each}} stands for a for loop. {{name}}, {{category}}, and {picPath}} are properties of a picture in our mongo collection. We will start with the for each loop. As you can see the loop has a kind of name ‘allPictures’. This name is used as an indicator in Javascript. The Javascript code looks as follows:
Template.allPictures.allPictures = function() {
    return Pictures.find().fetch();
}
Pretty simple or not? We just return all pictures of our collection. As you remember in step 8 we inserted some pictures with the properties name, category, and picPath. Meteor is able to read this properties and to fill it in the HTML template.
11. Check your new website
The last step before deploying your new webpage is to let it run local and to check if everything works fine. If your application is not running already, go to your project with the shell and type in meteor run. After that, open your browser and go to localhost:3000. If everything works you should see your new created website created with meteor.
12. Deploy to meteor
The deploy of your new meteor application is so easy that even my mum could do it 😛 So what we need to do is just go to your meteor project and type in the command meteor deploy [projectname] and hit enter. The rest, meteor is handling, so for us it is time to take a coffee or tea.