Setting up PWM as a password recovery tool for OpenLDAP
A running LDAP implementation without a password recovery service for users can be a real hassle for system administrators, in our case every time when a user forgets his/her password the only way to reset/change it was to go to the system administrator let him fix it.
As a solution for this problem we stumbled upon PWM as a password recovery service and in this blogpost will describe the steps you have to take to implement this yourself.
The reasons why we chose PWM as our service of choice are the following:
- Open-source and still being actively developed.
- It works with multiple LDAP implementations, including OpenLDAP.
- Pretty intuitive design for the end-user.
- A vast amount of configuration options, of which configuring our own password policy is one option.
- Able to recover password by sending and Email/SMS token or PIN.
- Captcha Integration with Google re-Captcha.
- Event logs and statistics that are available to administrators.
The rest of this post will focus on walking through the installation and initial configuration of PWM with an OpenLDAP system. Most of the things we describe can also be found in the PWM administration guide or from other sources. However, some things (eg. configuration of certain modules in PWM) we didn’t immediately understand and we will describe some tips/solutions here.
Lets get started
Requirements
- An Apache Tomcat instance for running PWM
- An OpenLDAP service
- (optional) A (self-signed) SSL/TLS certificate for securely running PWM
- PWM, we used 1.7.1, PWM’s development page can be found at https://code.google.com/p/pwm/
Our installation used Apache Tomcat 7 to serve PWM from a vm running Ubuntu 13.04.
Start by downloading pwm to your machine, in this example we use a dropbox mirror link for a pwm version 1.7.1 zip (also commonly found in other installation tutorials).
wget https://www.dropbox.com/s/gehtr2jgbr4s8wt/pwm_v1.7.1.zip
unzip pwm_v1.7.1.zip -d pwm_v1.7.1
Stop tomcat, deploy the war and start tomcat again.
sudo service tomcat7 stop

sudo cp pwm_v1.7.1/pwm.war /var/lib/tomcat7/webapps

sudo service tomcat7 start
This will deploy pwm to tomcat and you should now be able to reach the app (assuming you run Tomcat under port 8080) via:
http://<your_IP_address>:8080/pwm
Continuing the PWM Installation
To make the installation easier, PWM offers a configuration wizard.
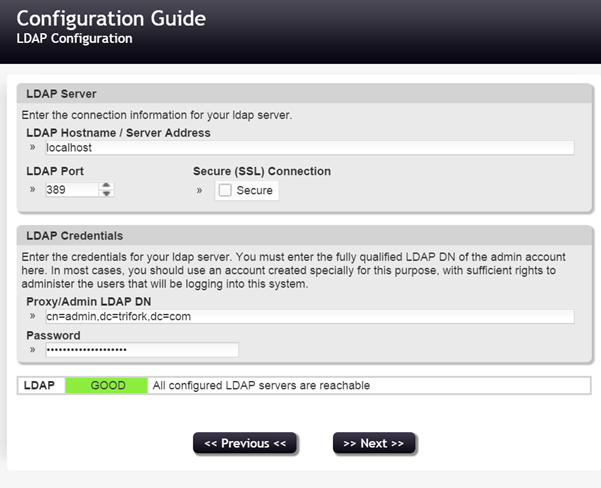
The first screen will establish a connection to your LDAP server, this is where you add your server details and proxy or admin account for connecting to your LDAP server.
Since we used a demo VM, we didn’t tick the SSL box in this case, but it’s obviously better to go with the secure connection for connecting to your LDAP server.
On the next page, we define the contextless login root. It is possible to enter multiple contexts, however initially pwm will want you to set just one.
This will let PWM know where to look for your ldap users. So if you, for instance, have an organizational unit (ou) called ‘users’, you might specify “ou=users,” followed by your domain component(s).
If you don’t configure a correct contextless login root, you have to specify the complete ldap entry on login (eg. cn=JohnDoe,ou=users,dc=example,dc=com), which wouldn’t be very user friendly.
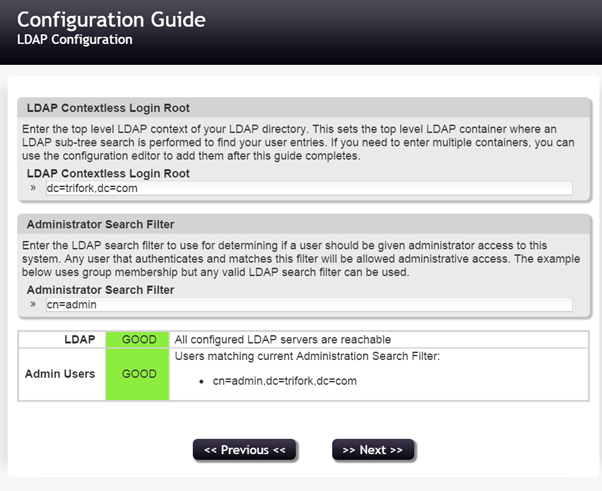
The administration search filter will give administrator access to its matching entries.
In this example we just enter cn=admin, matching our ldap admin user, so we can continue.
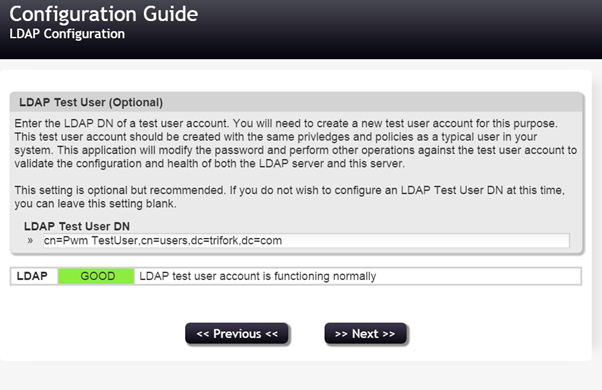
It is recommended that you set a test user so that PWM can do health checks periodically. Ideally, this is a user uniquely created for and used by PWM.
You are now able to complete the initial configuration for PWM. After this, you can login as ldap admin and make more changes to the configuration in the pwm configuration editor. The ldap configuration password you entered earlier is needed to access this editor.
Problems occurring upon not applying the PWM schema extensions
As we were eager to setup pwm without too much hassle, we only partly followed some tutorials and then tried doing the configuration of pwm on our own. We didn’t read the administration guide or any other source thoroughly yet and thus followed our first error.
As we logged in as ldap admin, with the intention of changing some profile settings to see if everything works correctly, we were prompted to set some recovery responses. PWM supports these type of security questions and answers as a method of recovering your account when you lose or forget your password. Everything went fine up until the point where we hit the save button.
We were greeted with the following error:
An error occurred during the save of your response questions. Please contact your administrator. {5045 ERROR_WRITING_RESPONSES (response storage only partially successful; attempts=1, successes=0) }
As found in the PWM Administration guide, PWM needs a schema extension in the ldap configuration. Another possibility to save responses, configurable in the configuration editor, would be to use a database. However, we decided to just use the schema extension. The administration guide describes the following schema extension:
dn: cn=pwm,cn=schema,cn=config
objectClass: olcSchemaConfig
cn: pwm
olcAttributeTypes: {0}( 1.3.6.1.4.1.591242.2.2010.04.16.1 NAME 'pwmEventLog' E
 QUALITY octetStringMatch SYNTAX 1.3.6.1.4.1.1466.115.121.1.40 )
olcAttributeTypes: {1}( 1.3.6.1.4.1.591242.2.2010.04.16.2 NAME 'pwmResponseSet
 ' EQUALITY octetStringMatch SYNTAX 1.3.6.1.4.1.1466.115.121.1.40 )
olcAttributeTypes: {2}( 1.3.6.1.4.1.591242.2.2010.04.16.3 NAME 'pwmLastPwdUpda
 te' SYNTAX 1.3.6.1.4.1.1466.115.121.1.24 )
olcAttributeTypes: {3}( 1.3.6.1.4.1.591242.2.2010.04.16.4 NAME 'pwmGUID' SYNTA
 X 1.3.6.1.4.1.1466.115.121.1.15 )
olcObjectClasses: {0}( 1.3.6.1.4.1.591242.1.2010.04.16.1 NAME 'pwmUser' AUXILI
 ARY MAY ( pwmLastPwdUpdate $ pwmEventLog $ pwmResponseSet $ pwmGUID ) )
To extend your configuration with this schema, save the above code as an LDIF file and run the ldapadd command to add it to your existing schema.
ldapadd -Y EXTERNAL -H ldapi:/// -f scheme_name_goes_here.ldif
After adding the pwm scheme, the responses setup works and saving password responses for existing users will succeed.
Another situation we found ourselves in later on, when testing with an actual existing environment without adding the pwm schema:
Logins of existing users didn’t work. When we imported an existing production environment in a clean OpenLDAP installation and foolishly forgot to add the schema again, we were unable to login.
The users from this production environment didn’t have the pwmUser object class and the necessary attributes. After adding the schema again, PWM automatically added the needed attributes when we did a login for one of those users.
Other things worth mentioning
Providing a value for your naming attribute in user registration
To automate LDAP user management as much as possible (to save valuable system administrators time), we enabled the “New User Registration” module. However, PWM has to provide LDAP with a unique distinguished name. If not provided by the registration form, pwm will solve this problem by setting random values. The DN will be formed by the naming attribute (set in Settings > LDAP Directory > (Advanced Settings) > LDAP Naming Attribute, eg. cn) and the random value set for that attribute.
Naturally, in a production environment, random values as distinguished names are not that common or an ideal situation. We found that in the advanced settings, you can disable these random characters. Go to View > Advanced Settings and set Random Username Length to zero.
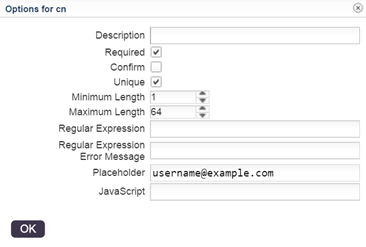
PWM now needs you to specify the value for the naming attribute yourself, if you don’t do this, user registration will not work. To do this, simply make the user specify it’s username. Create a text field in the New User Form with name of the naming attribute (eg. ‘cn’) and then label it ‘Username’ (or something that suits your implementation). PWM will now use this for the value of the naming attribute.
![]()
Since this field is required and should be unique in any case, hit Options and tick the boxes for required and unique.
Automatically write attributes based on form values
To avoid having to ask the user for the same values multiple times, you can use PWM macros. Let’s say you want to ask the user for it’s username to set the naming attribute.
However, you also want his/her display name (attribute ‘displayName’) to be the same as that same attribute.
Since LDAP doesn’t need the display name attribute to be provided upon creating, you can ask PWM to write this attribute post-creation with the value from the naming attribute.
If we have cn as our naming attribute, we add a New User Action in the New User Registration module under Modules. Let’s say we choose “displayName attribute write” as a Name, and “Write attribute displayName based on cn” as a description.
Pick ‘ldap’ from the dropdown following the description textfield.

Then, we choose Options and fill in the attribute name and value. The value will be the macro, it refers to the cn attribute that is already saved upon creation of the new user entry.
![]()
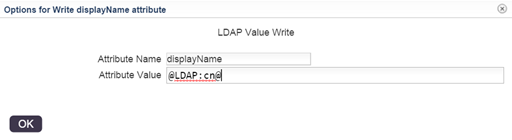
To view a list of available macros, click View > Macro Help in the menu.
Hit OK and we’re good to go, the user will now automatically get a displayName attribute derived from it’s common name (cn) attribute after it’s created.
Use local password policy on new user registration
By default (or at least in our case), PWM uses a test user password policy template for determining it’s user registration password policy. We found this a little confusing a first but then found out the setting hidden in Advanced Settings. Choose Enable View > Advanced Settings when in Modules > New User Registration and set New User Password Policy Template to a blank field instead of ‘TESTUSER’.

PWM will now use the local password policy for new user registrations.
Let the admin create users, but through PWM instead of manually
A thing we would’ve liked to implement was letting visitors sign up via PWM. Their accounts would then only be usable after admin activation. However, we didn’t find an easy way to do this via PWM. This would require having the appointed administrator being notified by email, and ideally with the option to have the admin activate the user’s account with a link.
PWM does however offer a guest registration module, this allows one or more selected ldap account(s) (defined by a search filter on the guest registration module page) to create new accounts. This would allow for new user creation by the admin. This however still requires manually creating user accounts as opposed to just clicking a link for activating a new user account.
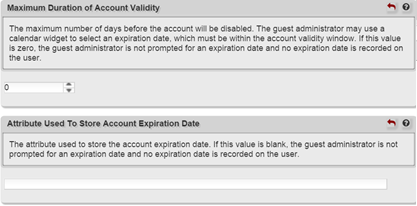
So, in the end, we decided against enabling the user registration or guest registration modules. When you do however find it useful to use the guest registration module for the purpose of creating new users, you should keep in mind that normally guests are set to expire.
It is therefore necessary to provide an expiration date upon guest account creation. You can disable this by setting the expiration date to zero and set the attribute field for the expiration date to blank to overcome this and thus create a guest account as a normal user.
Proxy user configuration with the naming attribute
One thing that slightly confused us was why the proxy user wasn’t handled correctly when configured with the naming attribute. However, the explanation for this, as stated in the help dialog, is: “This value should be in LDAP distinguished name format, even if your ldap directory accepts other types of values for the bind DN. An example of this format is cn=admin,o=example or cn=administrator,cn=users,dc=subdomain,dc=domain,dc=net.”
So the proxy user has to be specified in LDAP distinguished name format.
Disabling the setup of password responses
Since we were only going to use token verification sent by e-mail, we wanted to disable password responses. This is possible in the Forgotten Password module, but there you can only enable/disable the setting that requires users to fill in their previously stored responses to continue the password reset process.
Users still have to set up their responses when they login, and we didn’t immediately see the option to disable that. We later found out that this setting is not found on the Forgotten Password module page, but under Settings > Challenge Policy instead.
Niels Masdorp, Lars Leguyt, Daan Roet, Iris Koster and Jesse Alaerds