Service Discovery using Consul & Spring Cloud
Introduction
In one of our customer projects we are heavily using Spring Boot in combination with other Spring projects for our microservices.
One of the more complex parts of microservices, especially when you are using them as fine-grained as meant to be, will be the fact that you need to setup and maintain the connections between all those services. In Spring you are typically doing this using some way of externalized configuration like property files. But even then, it can become quite a challenge when you need to connect with for instance 20 other microservices.
To make it even more complex you definitely want, especially in cloud based solutions, something like scalability. Actually, this should be accomplished by running just another instance of your microservice. They are self-contained, so they just need some basic configuration like setting the port-number. But then you also need something to load-balance the different microservices serving the same purpose. And to be honest: I don’t care about the location and port! I just want a service which offers me a certain contract. And at runtime, when needed, I want them to behave differently depending on configuration.
So what we are actually looking for is a solution which provides an easy way to do service discovery and even better, can act as a load-balancer and even better, can provide my services with their configuration.
This is where Consul.io comes to the rescue. According to their website Consul is a solution which makes service discovery and service configuration easy and is distributed, highly available and datacenter-aware.
So let’s discover how Consul plays nicely with Spring Boot!
In this tutorial I’ll showcase an application with the following architecture:

The diagram above illustrates a service, the Dutch City Service, which registers (1) itself with Consul at startup. The Dutch City Client uses this service by discovering its location (2) by requesting it to Consul. Once the client knows about the location, it can call the service directly (3).
In the following paragraphs I describe how we will realize this application by first setting up Consul, followed by creating and registering a microservice in Consul using Spring Boot. We will then learn how to discover and user this microservice from a client using Spring Cloud. Finally we will see how we can scale out and load balance our microservice in different ways.
Install and run Consul
The following steps will guide you through the installation of Consul either using Docker or as a native installation.
Docker
If you are used to work with Docker you can use the following command to get Consul up-and-running:
<br><br> docker run -p 8500:8500 consul:0.7.1<br><br>
Native installation
For a native installation you can download an OS specific version of Consul here. It will come as a zip-file which you need to unzip to your preferred location. After installing the OS appropriate version you can download the Consul Web UI from the same page. The Web UI comes as a zip-file which you can extract to the installation directory where you’ve installed Consul.
Now you can start Consul by issuing the following command:
/consul agent -server -bootstrap-expect=1 -data-dir=consul-data -ui-dir=/dist
Be aware of the fact that the way we run Consul for this tutorial is not the advisable way!
Validate
After you’ve started Consul you can check if it is up-and-running by accessing the web interface on http://localhost:8500.
When you first open Consul it will directly open the Services menu. This page will give you a view of Consul’s service registry by showing all the registered services and their current status including Consul itself.
Register a service using Spring Cloud
The following steps will guide you through the creation of the Dutch City Service and registering it as a service in Consul’s service registry using the Spring Cloud Consul project.
Create a simple JAX-RS service
The easiest way to get started is to create a Spring Boot project using Spring Initializr. So go to start.spring.io and fill out the following Project Metadata:
- Generate a Maven Project with Spring Boot 1.4.2
- Group: com.trifork.service
- Artifact: dutch-city-service
- Search for dependencies: RS (and select ‘Jersey JAX-RS’).
Afterwards click the “Generate Project” button and save the dutch-city-service.zip file.
Extract this zip-file and open the Maven project (by importing the pom.xml) in your favorite IDE.
Now create the class com.trifork.service.Endpoint and add the following code:
<br><br>
package com.trifork.service;</p><br>
<p>import org.springframework.stereotype.Component;</p><br>
<p>import javax.ws.rs.GET;<br><br>
import javax.ws.rs.Path;<br><br>
import javax.ws.rs.Produces;<br><br>
import javax.ws.rs.core.MediaType;</p><br>
<p>@Component<br><br>
@Path("city")<br><br>
public class Endpoint {</p><br>
<p>@Produces({MediaType.APPLICATION_JSON})<br><br>
@GET<br><br>
@Path("/capital")<br><br>
public String[] capital() {<br><br>
return new String[] {<br><br>
"Arnhem", "Assen", "Den Bosch", "Den Haag",<br><br>
"Groningen", "Haarlem", "Leeuwarden", "Lelystad",<br><br>
"Maastricht", "Middelburg", "Utrecht", "Zwolle" };<br><br>
}<br><br>
}<br><br>
Create the class com.trifork.service.JerseyConfig and add the following code:
<br><br>
package com.trifork.service;</p><br>
<p>import org.glassfish.jersey.server.ResourceConfig;<br><br>
import org.springframework.context.annotation.Configuration;</p><br>
<p>@Configuration<br><br>
@ApplicationPath("/rest")<br><br>
public class JerseyConfig extends ResourceConfig {</p><br>
<p>public JerseyConfig() {<br><br>
register(Endpoint.class);<br><br>
}<br><br>
}<br><br>
At runtime both classes will provide a REST endpoint accessible at the context path ‘/rest/city/capital’. Calling this endpoint will give you a JSON object with all capital cities of The Netherlands.
Our service is ready for testing. Let’s start it by typing the following maven command:
<br><br> mvn spring-boot:run<br><br>
Now open the URL http://localhost:8080/rest/city/capital and you should see the capital cities.
Register the dutch-city-service
Make the following changes in order to enable automatic registration with Consul:
- Add a
<dependency>to the pom.xml:<br><br> &amp;lt;dependency&amp;gt;<br><br> &amp;lt;groupId&amp;gt;org.springframework.cloud&amp;lt;/groupId&amp;gt;<br><br> &amp;lt;artifactId&amp;gt;spring-cloud-starter-consul-discovery&amp;lt;/artifactId&amp;gt;<br><br> &amp;lt;/dependency&amp;gt;<br><br>
Add a
<dependencyManagement>section to the pom.xml:<br><br> &amp;lt;dependencyManagement&amp;gt;<br><br> &amp;lt;dependencies&amp;gt;<br><br> &amp;lt;dependency&amp;gt;<br><br> &amp;lt;groupId&amp;gt;org.springframework.cloud&amp;lt;/groupId&amp;gt;<br><br> &amp;lt;artifactId&amp;gt;spring-cloud-consul-dependencies&amp;lt;/artifactId&amp;gt;<br><br> &amp;lt;version&amp;gt;1.1.2.RELEASE&amp;lt;/version&amp;gt;<br><br> &amp;lt;type&amp;gt;pom&amp;lt;/type&amp;gt;<br><br> &amp;lt;scope&amp;gt;import&amp;lt;/scope&amp;gt;<br><br> &amp;lt;/dependency&amp;gt;<br><br> &amp;lt;/dependencies&amp;gt;<br><br> &amp;lt;/dependencyManagement&amp;gt;
- Add an
@EnableDiscoveryClientannotation to theDutchCityServiceApplicationclass. This will enable auto registration of our microservice with Consul:<br><br> @EnableDiscoveryClient<br><br> @SpringBootApplication<br><br> public class DutchCityServiceApplication {<br><br> ...<br><br> }<br><br>
When we restart the service the logging should show a line in the following form:
<br><br>
Registering service with Consul: NewService{id='bootstrap', name='bootstrap', tags=[], address='172.17.42.1', port=8080, check=Check{script='null', interval=10s, ttl=null, http=http://172.17.42.1:8080/health, tcp=null, timeout=null}}<br><br>
Let’s check if our service is visible in Consul: refresh the Services page of Consul again and you will see our new service appear like this:
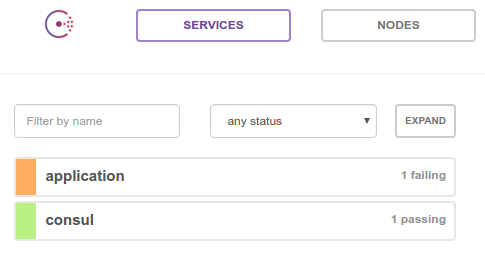
Unfortunately the service doesn’t have the expected name and it is failing.
Fix the name
Let’s fix the name issue first! To do this we need to add the entry spring.application.name=city-service to the application.properties. By adding this property you specify the name of our Spring Boot application which will be sent to Consul when the service is registered.
After restarting the application and refreshing the Consul Service page you will see this new name appear. Also the logging should show the name used during registration.
Fix the failing issue
To fix the failing issue you first need to understand what happens when a client registers with Consul. When registering it provides meta-data about itself such as its host, port and health-check URL. During this registration process a HTTP Check is created by default. This check instructs Consul to hit this health endpoint every 10 seconds by default. If the health check fails, the service instance is marked as critical. In the logging above you can see this meta-data. Try to open the health check URL as can be found in the logline or click this link. As you will find out our application doesn’t expose it’s health yet.
And this is where Spring Boot Actuator comes to the rescue by providing a number of additional features to help you monitor and manage your application. We can easily enable it by adding the following <dependency> to our pom.xml:
<br><br> &amp;lt;dependency&amp;gt;<br><br> &amp;lt;groupId&amp;gt;org.springframework.cloud&amp;lt;/groupId&amp;gt;<br><br> &amp;lt;artifactId&amp;gt;spring-cloud-starter-consul-discovery&amp;lt;/artifactId&amp;gt;<br><br> &amp;lt;/dependency&amp;gt;
After another restart you will notice that the service is now passing the checks and showing green on the Consul Services page. As you can see in the logging of our dutch-city-service a number of extra endpoints are enabled on which you can get extra information about your application. One of these endpoints is the /health endpoint.
Discover the service
Now that we are able to register services we also want to consume them. The following steps will guide you through creating a client for our newly created service.
Create a simple web project
The easiest way to get started again is by creating a Spring Boot project using Spring Initializr. So go to start.spring.io and fill out the following Project Metadata:
- Generate a Maven Project with Spring Boot 1.4.2
- Group: com.trifork
- Artifact: city-client
- Search for dependencies: Web (and select ‘Web’).
Afterwards click the “Generate Project” button and save the city-client.zip file.
Extract this zip-file and import the Maven project into your favorite IDE.
Now create the class com.trifork.client.CityRestController and add the following code:
<br><br>
package com.trifork.client;</p><br>
<p>import org.springframework.web.bind.annotation.RequestMapping;<br><br>
import org.springframework.web.bind.annotation.RestController;<br><br>
import org.springframework.web.client.RestTemplate;</p><br>
<p>@RestController<br><br>
@RequestMapping("/city")<br><br>
public class CityRestController {</p><br>
<p>RestTemplate restTemplate = new RestTemplate();</p><br>
<p>@GetMapping("/capital")<br><br>
public String[] capital() {<br><br>
String url = "http://localhost:8080/rest/city/capital";<br><br>
return restTemplate.getForObject(url, String[].class);<br><br>
}<br><br>
}<br><br>
The CityRestController will actually get the capitals from the previously created REST controller using Springs RestTemplate and return this data to the caller.
In order to be able to run this client together with our service we need to change its port. We do this by adding server.port=8090 to the clients application.properties.
Start this client by issuing the following command:
<br><br> mvn spring-boot:run<br><br>
Now try to connect to this URL http://localhost:8090/city/capital which should list all the capital cities as well.
No surprises so far! The only problem is the direct connection to our dutch-city-service. Of course we can externalize this connection details, but it still remains a fixed way of coupling which, in most cases, will need a restart to effectuate a change.
Using service discovery
So this is the moment to introduce service discovery. In this case we want our city-client to discover our dutch-city-service.
To accomplish this we first need to go through the same steps as we did with the service:
- Add the
spring-cloud-starter-consul-discoverydependency to the<dependencies>section of our pom.xml - Add the
spring-cloud-consul-dependenciesto the<dependencyManagement>section of our pom.xml - Add an
@EnableDiscoveryClientannotation to theCityClientApplicationclass
Now we can add the following field to the CityRestController:
<br><br> @Autowired<br><br> org.springframework.cloud.client.discovery.DiscoveryClient client;<br><br>
This DiscoveryClient interface can be used to request instances of all services which have a certain name. So by adding the following code to the capital method:
<br><br>
org.springframework.cloud.client.ServiceInstance serviceInstance =<br><br>
client.getInstances("city-service")<br><br>
.stream()<br><br>
.findFirst()<br><br>
.orElseThrow(() -&amp;amp;amp;gt; new RuntimeException("city-service not found"));<br><br>
we can retrieve all services with a name ‘city-service’ and we will select the first one (or else throw an exception)
Now we can replace the static url assignment with an url constructed from some information which is available in the serviceInstance:
<br><br> String url = serviceInstance.getUri().toString() + "/city/capital";<br><br>
Now let’s restart this City client and find out that the data is still retrieved: http://localhost:8090/city/capital
If you browse to the Consul Services page you will notice that our client is also registered (using the name ‘application’). This happens because of the @EnableDiscoveryClient annotation we’ve added. You could solve this by setting a proper name into the clients application.properties, but we can also disable service registration for the client as we only need the discovery part. We do this by adding spring.cloud.consul.discovery.register=false to the clients application.properties.
After restarting you will notice that the client is no longer registered on the Consul Services page and requesting the clients endpoint still gives a list of capitals.
Load balancing
So we are now able to dynamically lookup a registered service. This will be more useful if we run multiple instances of this same service. The easiest way to achieve this is by starting our dutch-city-service a second time on a different port. We can do this by specifying an extra vm argument specifying another port like this:
<br><br> mvn spring-boot:run -Dserver.port=8081<br><br>
On the Consul Services page you should notice an extra city-service registration:
![]()
If we call the REST client again you will still see the list of cities. So let’s stop the first dutch-city-service and verify if we still got a response. As you will find out this still functions, however… the list of ServiceInstances which is returned if we ask the discoveryClient for all the instances with the name ‘city-service’ proves to be always in the same order (assuming that multiple instances are running). We can prove this by adding a line of logging to the capital method in the Endpoint class in our dutch-city-service like this:
<br><br>
public String[] capital() {<br><br>
org.slf4j.LoggerFactory.LoggerFactory.getLogger(Endpoint.class).info("/rest/city/capital called");<br><br>
...<br><br>
}<br><br>
If we now restart our dutch-city-services and request the client endpoint multiple times you will notice that the “/city/capital called” logline only appears in the logging of one of our services. This happens to be the service which fully started first. The way to solve this is by using the loadbalancing feature of Spring Cloud.
To do this we need to refactor our CityRestController class in the following way:
- Replace the
DiscoveryClientinterface with anorg.springframework.cloud.client.loadbalancer.LoadBalancerClient - The
LoadBalancerClienthas thechoosemethod instead of thegetInstancesmethod to retrieve exactly oneServiceInstance. So let’s replace this part as well:<br><br> ServiceInstance serviceInstance =<br><br> client.choose("city-service");<br><br> org.apache.commons.lang.Validate.notNull(<br><br> serviceInstance, "city-service not found");<br><br>
Now let’s restart our client, do a bunch of requests and check the logging of our services again. Now you should notice that the load is evenly spread across our different service instances.
So this starts to look really nice apart from the fact that we’ve created some boiler-plate code in our CityRestController needed to discover and access an instance of our service. Luckily the annotation @LoadBalanced can help us reduce this code in the following way:
- Create the class
com.trifork.client.Configand add the following code:<br><br> package com.trifork.client;<p></p><br> <p>import org.springframework.cloud.client.loadbalancer.LoadBalanced;<br><br> import org.springframework.context.annotation.Bean;<br><br> import org.springframework.context.annotation.Configuration;<br><br> import org.springframework.web.client.RestTemplate;</p><br> <p>@Configuration<br><br> public class Config {</p><br> <p>@LoadBalanced<br><br> @Bean<br><br> public RestTemplate cityServiceRestTemplate() {<br><br> return new RestTemplate();<br><br> }<br><br> }<br><br>
- Add an
@Autowiredannotation to theRestTemplateinside theCityRestControllerclass and remove the initialization:<br><br> @Autowired<br><br> RestTemplate cityServiceRestTemplate;<br><br>
- Remove the
LoadBalancerClientfield inside theCityRestControllerclass - Replace all of the code inside the
capitalmethod with the following line:<br><br> return cityServiceRestTemplate.getForObject(<br><br> "http://city-service/rest/city/capital", String[].class);<br><br>
By applying this code change Spring will now manage the RestTemplate and since this RestTemplate is marked as LoadBalanced Spring Cloud ensures that calls to the instance of this RestTemplate are load balanced across the registered services. It does this by replacing requests to the address starting with http://city-service by the actual location and port of the specific city-service
Conclusion
We’ve created a client performing client-side load balancing on requests to our service using Spring Cloud. As you’ve hopefully discovered it is really easy to get up-and-running with the Consul service registry using Spring Boot in combination with Spring Cloud.
More information from Trifork: